
我们拿着手机拍照时,因为按下快门键造成手机抖动,拍的图片可能比较模糊。有一些拍照触发方式可以避免这个问题,例如使用耳机的音量按钮、检测微笑和检测语音活动。
在本文中,我们将讨论如何使用声音来触发拍照。我们将构建一个Web应用用于演示。
会使用以下API :
- getUserMedia:访问摄像头和麦克风
- Web Audio API:分析来自麦克风的音频
在线demo:
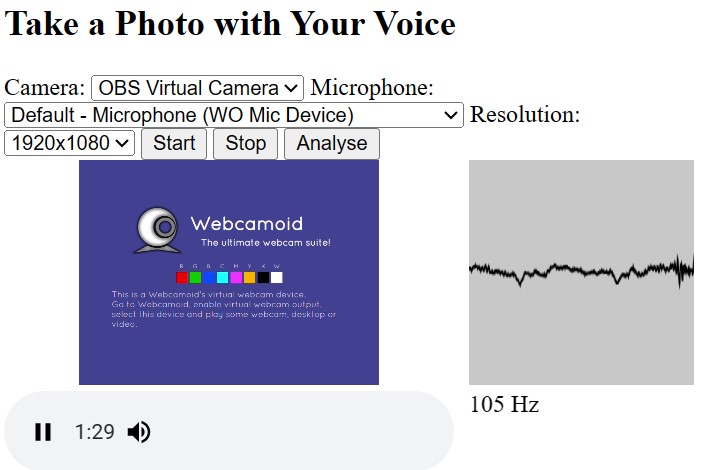
- Demo 1。一个显示音频图和音高的简单的demo。
- Demo 2。基于Dynamsoft的Mobile Web Capture解决方案的文档扫描demo。
Demo 2的视频:
编写支持声控拍照的Web应用
下面是分步实现过程。
新建HTML文件
创建一个包含以下内容的新HTML文件:
<!DOCTYPE html>
<html>
<head>
  <title>Take a Photo with Your Voice</title>
  <meta name="viewport" content="width=device-width,initial-scale=1.0,maximum-scale=1.0,user-scalable=0" />
  <style>
    #video {
      height: 150px;
      width: 300px;
    }

    #oscilloscope {
      width: 150px;
      height: 150px;
    }

    .output {
      display: flex;
      flex-wrap: wrap;
    }

    .visuals {
      margin-left: 10px;
    }

    .photos img {
      max-width: 150px;
      padding: 5px;
    }
  </style>
</head>
<body>
  <h2>Take a Photo with Your Voice</h2>
  <label>
    Camera:
    <select id="select-camera"></select>
  </label>
  <label>
    Microphone:
    <select id="select-microphone"></select>
  </label>
  <label>
    Resolution:
    <select id="select-resolution">
      <option value="640x480">640x480</option>
      <option value="1280x720">1280x720</option>
      <option value="1920x1080" selected>1920x1080</option>
      <option value="3840x2160">3840x2160</option>
    </select>
  </label>
  <button onclick="startCameraAndMicrophone();">Start</button>
  <button onclick="stopCameraAndMicrophone();">Stop</button>
  <button onclick="analyse();">Analyse</button>
  <div class="output">
    <div class="devices">
      <div>
        <video controls autoplay playsinline id="video"></video>
      </div>
      <div>
        <audio autoplay controls id="audio"></audio>
      </div>
    </div>
    <div class="visuals">
      <canvas id="oscilloscope"></canvas>
      <div id="note"></div>
    </div>
  </div>
  <div class="photos"></div>
</body>
</html>
它可以选择要使用的摄像头、分辨率和麦克风。它可以在canvas上绘制音频图形并检测其音高。如果音高超过阈值,进行拍照操作。
屏幕截图:
请求权限
请求摄像头权限:
async function requestCameraPermission() {
  try {
    const constraints = {video: true, audio: false};
    const stream = await navigator.mediaDevices.getUserMedia(constraints);
    closeStream(stream);
  } catch (error) {
    console.log(error);
    throw error;
  }
}

function closeStream(stream){
  if (stream) {
    const tracks = stream.getTracks();
    for (let i=0;i<tracks.length;i++) {
      const track = tracks[i];
      track.stop();  // stop the opened tracks
    }
  }
}
请求麦克风权限:
async function requestMicroPhonePermission() {
  try {
    const constraints = {video: false, audio: true};
    const stream = await navigator.mediaDevices.getUserMedia(constraints);
    closeStream(stream);
  } catch (error) {
    console.log(error);
    throw error;
  }
}
列出设备
列出摄像头:
async function listCameras(){
  let cameraSelect = document.getElementById("select-camera");
  let allDevices = await navigator.mediaDevices.enumerateDevices();
  for (let i = 0; i < allDevices.length; i++){
    let device = allDevices[i];
    if (device.kind == 'videoinput'){
      cameras.push(device);
      cameraSelect.appendChild(new Option(device.label,device.deviceId));
    }
  }
}
列出麦克风:
async function listMicrophones(){
  let microphoneSelect = document.getElementById("select-microphone");
  let allDevices = await navigator.mediaDevices.enumerateDevices();
  for (let i=0;i<allDevices.length;i++){
    let device = allDevices[i];
    if (device.kind == 'audioinput'){
      microphones.push(device);
      microphoneSelect.appendChild(new Option(device.label,device.deviceId));
    }
  }
}
打开摄像头和麦克风
使用以下代码打开摄像头和麦克风:
async function startCameraAndMicrophone(){
  let selectedCamera = cameras[document.getElementById("select-camera").selectedIndex];
  closeStream(document.getElementById("video").srcObject);
  let selectedResolution = document.getElementById("select-resolution").selectedOptions[0].value;
  let width = parseInt(selectedResolution.split("x")[0]);
  let height = parseInt(selectedResolution.split("x")[1]);
  const videoConstraints = {video: {deviceId: selectedCamera}, audio: false};
  const cameraStream = await navigator.mediaDevices.getUserMedia(videoConstraints);
  document.getElementById("video").srcObject = cameraStream;

  let selectedMicrophone = microphones[document.getElementById("select-microphone").selectedIndex];
  closeStream(document.getElementById("audio").srcObject);
  const audioConstraints = {video: false, audio: {deviceId: selectedMicrophone}};
  const audioStream = await navigator.mediaDevices.getUserMedia(audioConstraints);
  document.getElementById("audio").srcObject = audioStream;
}
我们可以使用以下代码关闭它们:
function stopCameraAndMicrophone(){
  closeStream(document.getElementById("video").srcObject);
  closeStream(document.getElementById("audio").srcObject);
  document.getElementById("video").srcObject = null;
  document.getElementById("audio").srcObject = null
}
检测音高
接下来,让我们使用Web Audio API来检测音高,以确定是否存在语音活动。
-
创建analyser示例。
let audioCtx = new (window.AudioContext || window.webkitAudioContext)(); let analyser = audioCtx.createAnalyser(); analyser.fftSize = 2048; -
将音频连接到analyser。
let stream = document.getElementById("audio").srcObject; let source = audioCtx.createMediaStreamSource(stream); source.connect(analyser); -
我们可以在canvas上绘制图像来可视化音频。
let bufferLength = analyser.frequencyBinCount; let dataArray = new Uint8Array(bufferLength); analyser.getByteTimeDomainData(dataArray); let canvas = document.getElementById("oscilloscope"); let canvasCtx = canvas.getContext("2d"); function draw() { if (!document.getElementById("audio").srcObject){ return; } drawVisual = requestAnimationFrame(draw); analyser.getByteTimeDomainData(dataArray); canvasCtx.fillStyle = "rgb(200, 200, 200)"; canvasCtx.fillRect(0, 0, canvas.width, canvas.height); canvasCtx.lineWidth = 2; canvasCtx.strokeStyle = "rgb(0, 0, 0)"; canvasCtx.beginPath(); let sliceWidth = (canvas.width * 1.0) / bufferLength; let x = 0; for (let i = 0; i < bufferLength; i++) { let v = dataArray[i] / 128.0; let y = (v * canvas.height) / 2; if (i === 0) { canvasCtx.moveTo(x, y); } else { canvasCtx.lineTo(x, y); } x += sliceWidth; } canvasCtx.lineTo(canvas.width, canvas.height / 2); canvasCtx.stroke(); } draw(); -
绘制图像的同时,可以检测音高。计算连续检测到的音高值的相似度,让结果更平滑。
let previousValueToDisplay = 0;
let smoothingCount = 0;
let smoothingThreshold = 10;
let smoothingCountThreshold = 5;
let calculatePitch = function() {
  console.log("calculatePitch");
  if (!document.getElementById("audio").srcObject){
    return;
  }
  let bufferLength = analyser.fftSize;
  let buffer = new Float32Array(bufferLength);
  analyser.getFloatTimeDomainData(buffer);
  let autoCorrelateValue = autoCorrelate(buffer, audioCtx.sampleRate);
  if (autoCorrelateValue === -1) {
    document.getElementById('note').innerText = 'Too quiet...';
    return;
  }
  // Handle rounding
  let valueToDisplay = autoCorrelateValue;
  valueToDisplay = Math.round(valueToDisplay);
  function voiceIsSimilarEnough() {
    // Check threshold for number
    let diff = Math.abs(valueToDisplay - previousValueToDisplay);
    return diff < smoothingThreshold;
  }
  // Check if this value has been within the given range for n iterations
  if (noteIsSimilarEnough()) {
    if (smoothingCount < smoothingCountThreshold) {
      smoothingCount++;
      return;
    } else {
      previousValueToDisplay = valueToDisplay;
      smoothingCount = 0;
    }
  } else {
    previousValueToDisplay = valueToDisplay;
    smoothingCount = 0;
    return;
  }
  valueToDisplay += ' Hz';
  document.getElementById('note').innerText = valueToDisplay;
}
在这里,我们使用以下函数,通过
自相关从音频数据获取音高。// Must be called on analyser.getFloatTimeDomainData and audioContext.sampleRate // From https://github.com/cwilso/PitchDetect/pull/23 function autoCorrelate(buffer, sampleRate) { // Perform a quick root-mean-square to see if we have enough signal let SIZE = buffer.length; let sumOfSquares = 0; for (let i = 0; i < SIZE; i++) { let val = buffer[i]; sumOfSquares += val * val; } let rootMeanSquare = Math.sqrt(sumOfSquares / SIZE) if (rootMeanSquare < 0.01) { return -1; } // Find a range in the buffer where the values are below a given threshold. let r1 = 0; let r2 = SIZE - 1; let threshold = 0.2; // Walk up for r1 for (let i = 0; i < SIZE / 2; i++) { if (Math.abs(buffer[i]) < threshold) { r1 = i; break; } } // Walk down for r2 for (let i = 1; i < SIZE / 2; i++) { if (Math.abs(buffer[SIZE - i]) < threshold) { r2 = SIZE - i; break; } } // Trim the buffer to these ranges and update SIZE. buffer = buffer.slice(r1, r2); SIZE = buffer.length // Create a new array of the sums of offsets to do the autocorrelation let c = new Array(SIZE).fill(0); // For each potential offset, calculate the sum of each buffer value times its offset value for (let i = 0; i < SIZE; i++) { for (let j = 0; j < SIZE - i; j++) { c[i] = c[i] + buffer[j] * buffer[j+i] } } // Find the last index where that value is greater than the next one (the dip) let d = 0; while (c[d] > c[d+1]) { d++; } // Iterate from that index through the end and find the maximum sum let maxValue = -1; let maxIndex = -1; for (let i = d; i < SIZE; i++) { if (c[i] > maxValue) { maxValue = c[i]; maxIndex = i; } } let T0 = maxIndex; // Not as sure about this part, don't @ me // From the original author: // interpolation is parabolic interpolation. It helps with precision. We suppose that a parabola pass through the // three points that comprise the peak. 'a' and 'b' are the unknowns from the linear equation system and b/(2a) is // the "error" in the abscissa. Well x1,x2,x3 should be y1,y2,y3 because they are the ordinates. let x1 = c[T0 - 1]; let x2 = c[T0]; let x3 = c[T0 + 1] let a = (x1 + x3 - 2 * x2) / 2; let b = (x3 - x1) / 2 if (a) { T0 = T0 - b / (2 * a); } return sampleRate/T0; }
检测到声音后拍照
如果我们成功检测到声音,进行拍照。
function takePhoto(){
  let currentTime = Date.now();
  if (currentTime - photoTakenTime < 1000*2) {
    console.log("within 2 seconds since last capture");
    return;
  }
  photoTakenTime = currentTime;
  let video = document.getElementById("video");
  let canvas = document.createElement("canvas");
  let w = video.videoWidth;
  var h = video.videoHeight;
  canvas.width  = w;
  canvas.height = h;
  let ctx = canvas.getContext('2d');
  ctx.drawImage(video, 0, 0, w, h);
  let img = document.createElement("img");
  img.src = canvas.toDataURL();
  document.getElementsByClassName("photos")[0].appendChild(img);
}
将声音检测功能集成到文档扫描应用
接下来,让我们使用Mobile Web Capture编写一个文档扫描Web应用,并集成声音检测功能。
构建文档扫描Web应用
-
创建新的HTML文件。
与上一个文件类似,它可以选择要使用的摄像头、麦克风和分辨率。
<!DOCTYPE html> <html> <head> <title>Scan Documents with Your Voice</title> <meta name="viewport" content="width=device-width,initial-scale=1.0,maximum-scale=1.0,user-scalable=0" /> <style> #audio { display: none; } #container { max-width: 100%; height: 480px; } </style> </head> <body> <h2>Scan Documents with Your Voice</h2> <label> Camera: <select id="select-camera"></select> </label> <label> Microphone: <select id="select-microphone"></select> </label> <label> Resolution: <select id="select-resolution"> <option value="640x480">640x480</option> <option value="1280x720">1280x720</option> <option value="1920x1080" selected>1920x1080</option> <option value="3840x2160">3840x2160</option> </select> </label> <button onclick="startScanning();">Start</button> <div id="container"></div> <audio autoplay controls muted id="audio"></audio> </body> </html> -
在head包括Mobile Web Capture的库。
<script src="https://cdn.jsdelivr.net/npm/dynamsoft-core@3.0.30/dist/core.js"></script> <script src="https://cdn.jsdelivr.net/npm/dynamsoft-license@3.0.20/dist/license.js"></script> <script src="https://cdn.jsdelivr.net/npm/dynamsoft-document-normalizer@2.0.20/dist/ddn.js"></script> <script src="https://cdn.jsdelivr.net/npm/dynamsoft-capture-vision-router@2.0.30/dist/cvr.js"></script> <script src="https://cdn.jsdelivr.net/npm/dynamsoft-document-viewer@1.1.0/dist/ddv.js"></script> <link rel="stylesheet" href="https://cdn.jsdelivr.net/npm/dynamsoft-document-viewer@1.1.0/dist/ddv.css"> -
使用许可证初始化核心的库。可以在这里申请许可证。
async function initMobileWebCapture(){ Dynamsoft.Core.CoreModule.loadWasm(["DDN"]); Dynamsoft.DDV.Core.loadWasm(); // Initialize DDN await Dynamsoft.License.LicenseManager.initLicense( "DLS2eyJoYW5kc2hha2VDb2RlIjoiMjAwMDAxLTE2NDk4Mjk3OTI2MzUiLCJvcmdhbml6YXRpb25JRCI6IjIwMDAwMSIsInNlc3Npb25QYXNzd29yZCI6IndTcGR6Vm05WDJrcEQ5YUoifQ==", true ); // Initialize DDV await Dynamsoft.DDV.Core.init(); } -
使用Dynamsoft Document Normalizer作为Dynamsoft Document Viewer的文档检测处理程序(Mobile Web Capture基于这两个产品)。
async function initDocDetectModule(DDV, CVR) { const router = await CVR.CaptureVisionRouter.createInstance(); await router.initSettings("{\"CaptureVisionTemplates\": [{\"Name\": \"Default\"},{\"Name\": \"DetectDocumentBoundaries_Default\",\"ImageROIProcessingNameArray\": [\"roi-detect-document-boundaries\"]},{\"Name\": \"DetectAndNormalizeDocument_Default\",\"ImageROIProcessingNameArray\": [\"roi-detect-and-normalize-document\"]},{\"Name\": \"NormalizeDocument_Binary\",\"ImageROIProcessingNameArray\": [\"roi-normalize-document-binary\"]}, {\"Name\": \"NormalizeDocument_Gray\",\"ImageROIProcessingNameArray\": [\"roi-normalize-document-gray\"]}, {\"Name\": \"NormalizeDocument_Color\",\"ImageROIProcessingNameArray\": [\"roi-normalize-document-color\"]}],\"TargetROIDefOptions\": [{\"Name\": \"roi-detect-document-boundaries\",\"TaskSettingNameArray\": [\"task-detect-document-boundaries\"]},{\"Name\": \"roi-detect-and-normalize-document\",\"TaskSettingNameArray\": [\"task-detect-and-normalize-document\"]},{\"Name\": \"roi-normalize-document-binary\",\"TaskSettingNameArray\": [\"task-normalize-document-binary\"]}, {\"Name\": \"roi-normalize-document-gray\",\"TaskSettingNameArray\": [\"task-normalize-document-gray\"]}, {\"Name\": \"roi-normalize-document-color\",\"TaskSettingNameArray\": [\"task-normalize-document-color\"]}],\"DocumentNormalizerTaskSettingOptions\": [{\"Name\": \"task-detect-and-normalize-document\",\"SectionImageParameterArray\": [{\"Section\": \"ST_REGION_PREDETECTION\",\"ImageParameterName\": \"ip-detect-and-normalize\"},{\"Section\": \"ST_DOCUMENT_DETECTION\",\"ImageParameterName\": \"ip-detect-and-normalize\"},{\"Section\": \"ST_DOCUMENT_NORMALIZATION\",\"ImageParameterName\": \"ip-detect-and-normalize\"}]},{\"Name\": \"task-detect-document-boundaries\",\"TerminateSetting\": {\"Section\": \"ST_DOCUMENT_DETECTION\"},\"SectionImageParameterArray\": [{\"Section\": \"ST_REGION_PREDETECTION\",\"ImageParameterName\": \"ip-detect\"},{\"Section\": \"ST_DOCUMENT_DETECTION\",\"ImageParameterName\": \"ip-detect\"},{\"Section\": \"ST_DOCUMENT_NORMALIZATION\",\"ImageParameterName\": \"ip-detect\"}]},{\"Name\": \"task-normalize-document-binary\",\"StartSection\": \"ST_DOCUMENT_NORMALIZATION\", \"ColourMode\": \"ICM_BINARY\",\"SectionImageParameterArray\": [{\"Section\": \"ST_REGION_PREDETECTION\",\"ImageParameterName\": \"ip-normalize\"},{\"Section\": \"ST_DOCUMENT_DETECTION\",\"ImageParameterName\": \"ip-normalize\"},{\"Section\": \"ST_DOCUMENT_NORMALIZATION\",\"ImageParameterName\": \"ip-normalize\"}]}, {\"Name\": \"task-normalize-document-gray\", \"ColourMode\": \"ICM_GRAYSCALE\",\"StartSection\": \"ST_DOCUMENT_NORMALIZATION\",\"SectionImageParameterArray\": [{\"Section\": \"ST_REGION_PREDETECTION\",\"ImageParameterName\": \"ip-normalize\"},{\"Section\": \"ST_DOCUMENT_DETECTION\",\"ImageParameterName\": \"ip-normalize\"},{\"Section\": \"ST_DOCUMENT_NORMALIZATION\",\"ImageParameterName\": \"ip-normalize\"}]}, {\"Name\": \"task-normalize-document-color\", \"ColourMode\": \"ICM_COLOUR\",\"StartSection\": \"ST_DOCUMENT_NORMALIZATION\",\"SectionImageParameterArray\": [{\"Section\": \"ST_REGION_PREDETECTION\",\"ImageParameterName\": \"ip-normalize\"},{\"Section\": \"ST_DOCUMENT_DETECTION\",\"ImageParameterName\": \"ip-normalize\"},{\"Section\": \"ST_DOCUMENT_NORMALIZATION\",\"ImageParameterName\": \"ip-normalize\"}]}],\"ImageParameterOptions\": [{\"Name\": \"ip-detect-and-normalize\",\"BinarizationModes\": [{\"Mode\": \"BM_LOCAL_BLOCK\",\"BlockSizeX\": 0,\"BlockSizeY\": 0,\"EnableFillBinaryVacancy\": 0}],\"TextDetectionMode\": {\"Mode\": \"TTDM_WORD\",\"Direction\": \"HORIZONTAL\",\"Sensitivity\": 7}},{\"Name\": \"ip-detect\",\"BinarizationModes\": [{\"Mode\": \"BM_LOCAL_BLOCK\",\"BlockSizeX\": 0,\"BlockSizeY\": 0,\"EnableFillBinaryVacancy\": 0,\"ThresholdCompensation\" : 7}],\"TextDetectionMode\": {\"Mode\": \"TTDM_WORD\",\"Direction\": \"HORIZONTAL\",\"Sensitivity\": 7},\"ScaleDownThreshold\" : 512},{\"Name\": \"ip-normalize\",\"BinarizationModes\": [{\"Mode\": \"BM_LOCAL_BLOCK\",\"BlockSizeX\": 0,\"BlockSizeY\": 0,\"EnableFillBinaryVacancy\": 0}],\"TextDetectionMode\": {\"Mode\": \"TTDM_WORD\",\"Direction\": \"HORIZONTAL\",\"Sensitivity\": 7}}]}"); class DDNNormalizeHandler extends DDV.DocumentDetect { async detect(image, config) { if (!router) { return Promise.resolve({ success: false }); }; let width = image.width; let height = image.height; let ratio = 1; let data; if (height > 720) { ratio = height / 720; height = 720; width = Math.floor(width / ratio); data = compress(image.data, image.width, image.height, width, height); } else { data = image.data.slice(0); } // Define DSImage according to the usage of DDN const DSImage = { bytes: new Uint8Array(data), width, height, stride: width * 4, //RGBA format: 10 // IPF_ABGR_8888 }; // Use DDN normalized module const results = await router.capture(DSImage, 'DetectDocumentBoundaries_Default'); // Filter the results and generate corresponding return values if (results.items.length <= 0) { return Promise.resolve({ success: false }); }; const quad = []; results.items[0].location.points.forEach((p) => { quad.push([p.x * ratio, p.y * ratio]); }); const detectResult = this.processDetectResult({ location: quad, width: image.width, height: image.height, config }); return Promise.resolve(detectResult); } } DDV.setProcessingHandler('documentBoundariesDetect', new DDNNormalizeHandler()) } function compress( imageData, imageWidth, imageHeight, newWidth, newHeight, ) { let source = null; try { source = new Uint8ClampedArray(imageData); } catch (error) { source = new Uint8Array(imageData); } const scaleW = newWidth / imageWidth; const scaleH = newHeight / imageHeight; const targetSize = newWidth * newHeight * 4; const targetMemory = new ArrayBuffer(targetSize); let distData = null; try { distData = new Uint8ClampedArray(targetMemory, 0, targetSize); } catch (error) { distData = new Uint8Array(targetMemory, 0, targetSize); } const filter = (distCol, distRow) => { const srcCol = Math.min(imageWidth - 1, distCol / scaleW); const srcRow = Math.min(imageHeight - 1, distRow / scaleH); const intCol = Math.floor(srcCol); const intRow = Math.floor(srcRow); let distI = (distRow * newWidth) + distCol; let srcI = (intRow * imageWidth) + intCol; distI *= 4; srcI *= 4; for (let j = 0; j <= 3; j += 1) { distData[distI + j] = source[srcI + j]; } }; for (let col = 0; col < newWidth; col += 1) { for (let row = 0; row < newHeight; row += 1) { filter(col, row); } } return distData; } // Configure document boundaries function await initDocDetectModule(Dynamsoft.DDV, Dynamsoft.CVR); -
使用图像编辑组件默认的图像滤镜。
// Configure image filter feature which is in edit viewer Dynamsoft.DDV.setProcessingHandler("imageFilter", new Dynamsoft.DDV.ImageFilter()); -
创建三个组件的实例:Capture Viewer ,用于打开相机并扫描文档;Perspective Viewer,用于检测和修改文档边界;Edit Viewer ,用于编辑和查看扫描的文档。我们需要配置他们的UI,然后创建实例。
-
初始化Capture Viewer。
const captureViewerUiConfig = { type: Dynamsoft.DDV.Elements.Layout, flexDirection: "column", children: [ { type: Dynamsoft.DDV.Elements.Layout, className: "ddv-capture-viewer-header-mobile", children: [ { type: "CameraResolution", className: "ddv-capture-viewer-resolution", }, Dynamsoft.DDV.Elements.Flashlight, ], }, Dynamsoft.DDV.Elements.MainView, { type: Dynamsoft.DDV.Elements.Layout, className: "ddv-capture-viewer-footer-mobile", children: [ Dynamsoft.DDV.Elements.AutoDetect, Dynamsoft.DDV.Elements.AutoCapture, { type: "Capture", className: "ddv-capture-viewer-captureButton", }, { // Bind click event to "ImagePreview" element // The event will be registered later. type: Dynamsoft.DDV.Elements.ImagePreview, events:{ click: "showPerspectiveViewer" } }, Dynamsoft.DDV.Elements.CameraConvert, ], }, ], }; // Create a capture viewer captureViewer = new Dynamsoft.DDV.CaptureViewer({ container: "container", uiConfig: captureViewerUiConfig, viewerConfig: { acceptedPolygonConfidence: 60, enableAutoDetect: false, } }); -
初始化Perspective Viewer。
const perspectiveUiConfig = { type: Dynamsoft.DDV.Elements.Layout, flexDirection: "column", children: [ { type: Dynamsoft.DDV.Elements.Layout, className: "ddv-perspective-viewer-header-mobile", children: [ { // Add a "Back" button in perspective viewer's header and bind the event to go back to capture viewer. // The event will be registered later. type: Dynamsoft.DDV.Elements.Button, className: "ddv-button-back", events:{ click: "backToCaptureViewer" } }, Dynamsoft.DDV.Elements.Pagination, { // Bind event for "PerspectiveAll" button to show the edit viewer // The event will be registered later. type: Dynamsoft.DDV.Elements.PerspectiveAll, events:{ click: "showEditViewer" } }, ], }, Dynamsoft.DDV.Elements.MainView, { type: Dynamsoft.DDV.Elements.Layout, className: "ddv-perspective-viewer-footer-mobile", children: [ Dynamsoft.DDV.Elements.FullQuad, Dynamsoft.DDV.Elements.RotateLeft, Dynamsoft.DDV.Elements.RotateRight, Dynamsoft.DDV.Elements.DeleteCurrent, Dynamsoft.DDV.Elements.DeleteAll, ], }, ], }; // Create a perspective viewer perspectiveViewer = new Dynamsoft.DDV.PerspectiveViewer({ container: "container", groupUid: captureViewer.groupUid, uiConfig: perspectiveUiConfig, viewerConfig: { scrollToLatest: true, } }); perspectiveViewer.hide(); -
初始化Edit Viewer。
const editViewerUiConfig = { type: Dynamsoft.DDV.Elements.Layout, flexDirection: "column", className: "ddv-edit-viewer-mobile", children: [ { type: Dynamsoft.DDV.Elements.Layout, className: "ddv-edit-viewer-header-mobile", children: [ { // Add a "Back" buttom to header and bind click event to go back to the perspective viewer // The event will be registered later. type: Dynamsoft.DDV.Elements.Button, className: "ddv-button-back", events:{ click: "backToPerspectiveViewer" } }, Dynamsoft.DDV.Elements.Pagination, Dynamsoft.DDV.Elements.Download, ], }, Dynamsoft.DDV.Elements.MainView, { type: Dynamsoft.DDV.Elements.Layout, className: "ddv-edit-viewer-footer-mobile", children: [ Dynamsoft.DDV.Elements.DisplayMode, Dynamsoft.DDV.Elements.RotateLeft, Dynamsoft.DDV.Elements.Crop, Dynamsoft.DDV.Elements.Filter, Dynamsoft.DDV.Elements.Undo, Dynamsoft.DDV.Elements.Delete, Dynamsoft.DDV.Elements.Load, ], }, ], }; // Create an edit viewer editViewer = new Dynamsoft.DDV.EditViewer({ container: "container", groupUid: captureViewer.groupUid, uiConfig: editViewerUiConfig }); editViewer.hide(); -
定义函数,使三个组件协同工作。
// Register an event in `captureViewer` to show the perspective viewer
captureViewer.on("showPerspectiveViewer",() => {
    switchViewer(0,1,0);
});

// Register an event in `perspectiveViewer` to go back the capture viewer
perspectiveViewer.on("backToCaptureViewer",() => {
    switchViewer(1,0,0);
    captureViewer.play().catch(err => {alert(err.message)});
});

// Register an event in `perspectiveViewer` to show the edit viewer
perspectiveViewer.on("showEditViewer",() => {
    switchViewer(0,0,1)
});

// Register an event in `editViewer` to go back the perspective viewer
editViewer.on("backToPerspectiveViewer",() => {
    switchViewer(0,1,0);
});

// Define a function to control the viewers' visibility
const switchViewer = (c,p,e) => {
  captureViewer.hide();
  perspectiveViewer.hide();
  editViewer.hide();

  if(c) {
    captureViewer.show();
  } else {
    captureViewer.stop();
  }

  if(p) perspectiveViewer.show();
  if(e) editViewer.show();
};
-
-
启动Mobile Web Capture的Capture Viewer开始扫描。
async function startScanning(){
  let selectedCamera = cameras[document.getElementById("select-camera").selectedIndex];
  await captureViewer.selectCamera(selectedCamera.deviceId);
  let selectedResolution = document.getElementById("select-resolution").selectedOptions[0].value;
  let width = parseInt(selectedResolution.split("x")[0]);
  let height = parseInt(selectedResolution.split("x")[1]);
  captureViewer.play({
    resolution: [width,height],
  }).catch(err => {
    alert(err.message)
  });
}
使用语音检测拍照
-
在Capture Viewer的UI配置中,将语音图标添加到上方的工具栏。
 {
     type: Dynamsoft.DDV.Elements.Layout,
     className: "ddv-capture-viewer-header-mobile",
     children: [
         {
             type: "CameraResolution",
             className: "ddv-capture-viewer-resolution",
         },
+        {
+          type: Dynamsoft.DDV.Elements.Button,
+          className: "voice-icon",
+          style: {
+            display: "flex",
+          },
+          events: {
+            click: "enableVoiceDetection",
+          },
+        },
         Dynamsoft.DDV.Elements.Flashlight,
     ],
 },
图标的样式:
.voice-icon { background-image: url("./voice.svg"); background-position: top; background-size: contain; background-repeat: no-repeat; filter: invert(1); } .voice-icon.enabled { filter: invert(1) sepia(100%) saturate(100) hue-rotate(1400deg); } -
为语音图标按钮注册事件。
captureViewer.on("enableVoiceDetection",e => { console.log("click"); let icon = document.getElementsByClassName("voice-icon")[0]; if (icon.classList.contains("enabled")) { icon.classList.remove("enabled"); toggleVoiceDetection(false); }else{ icon.classList.add("enabled"); toggleVoiceDetection(true); } }); async function toggleVoiceDetection(enabled){ let audio = document.getElementById("audio"); if (enabled) { if (!audio.srcObject) { //open the microphone for detection let selectedMicrophone = microphones[document.getElementById("select-microphone").selectedIndex]; const audioConstraints = {video: false, audio: {deviceId: selectedMicrophone}}; const audioStream = await navigator.mediaDevices.getUserMedia(audioConstraints); audio.srcObject = audioStream; startVoiceDetection(); } }else{ stopVoiceDetection(); closeStream(audio.srcObject); audio.srcObject = null } } -
如果语音检测被启用,创建一个interval以检测音高。检测代码与上一部分中的代码相同。
let interval; let processing = false; function startVoiceDetection(){ if (!document.getElementById("audio").srcObject){ return; } stopVoiceDetection(); audioCtx = new (window.AudioContext || window.webkitAudioContext)(); analyser = audioCtx.createAnalyser(); let stream = document.getElementById("audio").srcObject; let source = audioCtx.createMediaStreamSource(stream); source.connect(analyser); analyser.fftSize = 2048; const analyse = () => { processing = true; let bufferLength = analyser.fftSize; let buffer = new Float32Array(bufferLength); analyser.getFloatTimeDomainData(buffer); let autoCorrelateValue = autoCorrelate(buffer, audioCtx.sampleRate); processing = false; if (autoCorrelateValue === -1) { //'Too quiet...'; return; } // Handle rounding let valueToDisplay = autoCorrelateValue; valueToDisplay = Math.round(valueToDisplay); function noteIsSimilarEnough() { // Check threshold for number, or just difference for notes. let diff = Math.abs(valueToDisplay - previousValueToDisplay); return diff < smoothingThreshold; } // Check if this value has been within the given range for n iterations if (noteIsSimilarEnough()) { if (smoothingCount < smoothingCountThreshold) { smoothingCount++; console.log("threshold not meet"); return; } else { previousValueToDisplay = valueToDisplay; smoothingCount = 0; } } else { previousValueToDisplay = valueToDisplay; smoothingCount = 0; return; } takePhoto(); } interval = setInterval(analyse,0) } function stopVoiceDetection(){ processing = false; previousValueToDisplay = 0; clearInterval(interval); } -
使用Capture Viewer拍摄照片。
async function takePhoto(){
  let currentTime = Date.now();
  if (currentTime - photoTakenTime < 1000*2) {
    console.log("within 2 seconds since last capture");
    return;
  }
  await captureViewer.capture();
  photoTakenTime = currentTime;
}
局限性
我们只通过计算音高来检测语音活动。它可能无法在嘈杂的环境中工作。可以使用Web Speech API来完善这一个功能,比如它可以识别我们所说的话,以便我们使用“拍照”等语音命令来触发拍照。不过,目前的方法与语言无关,也是一个优点。
源代码
欢迎下载源代码并尝试使用: