
持续文件同步程序能实时同步两个或多个设备之间的文件。我们可以使用它们来同步扫描的文档,这样我们就可以在多个设备上访问这些文件。
有很多云存储服务可以完成这项工作,比如坚果云、百度网盘、Box、Dropbox、Onedrive和Google Drive。还有像Syncthing和Resilio Sync这样的程序,它们使用去中心化的P2P系统。
这些服务或程序用法比较简单。添加或重命名一个文件,变动会立即得到同步。
同步使用Dynamic Web TWAIN扫描的文档
Dynamic Web TWAIN (DWT) 是用于构建 Web 文档扫描应用程序的 SDK(在线演示)。
我们可以在浏览器上用DWT扫描文档,然后将它们保存到同步文件夹中。
有两种方法可以将扫描的文档同步到如Onedrive和Dropbox这样的文件同步服务。一种是将文件保存到这些服务的本地文件夹中,让后台程序自动发现更改并同步。另一种方法是使用API直接上传文档。
将扫描的文档保存到本地文件夹
在DWT中,我们可以使用其保存功能将扫描的文档保存到指定的文件夹中:
DWObject.IfShowFileDialog = false;
//Save to a folder with its absolute path
DWObject.SaveAllAsPDF("D:\\ScannedDocuments\\Sample.pdf",
    function() {
        console.log('Successful!');
    },
    function(errCode, errString) {
        console.log(errString);
    }
);
我们可以用格式化日期命名文件:
DWObject.IfShowFileDialog = false;
DWObject.SaveAllAsPDF("D:\\ScannedDocuments\\"+getFormattedDate()+".pdf",
    function() {
        console.log('Successful!');
    },
    function(errCode, errString) {
        console.log(errString);
    }
);

function getFormattedDate() {
    var date = new Date();

    var month = date.getMonth() + 1;
    var day = date.getDate();
    var hour = date.getHours();
    var min = date.getMinutes();
    var sec = date.getSeconds();

    month = (month < 10 ? "0" : "") + month;
    day = (day < 10 ? "0" : "") + day;
    hour = (hour < 10 ? "0" : "") + hour;
    min = (min < 10 ? "0" : "") + min;
    sec = (sec < 10 ? "0" : "") + sec;

    var str = date.getFullYear().toString() + month + day + hour + min + sec;

    return str;
}
文件保存后,同步程序会将新文件同步到连接的设备。
但这不适用于移动设备,因为移动系统中我们无法指定下载文件的保存位置。
使用API上传文件
大多数文件同步服务都提供了API,以便我们可以直接上传文档。尽管这需要额外的工作,但这种方式同时适用于桌面和移动设备。
本文中,我们将把Dropbox和Onedrive集成到一个文档扫描Web应用程序中。
上传到Dropbox和Onedrive的流程是类似的。
首先,我们将用户重定向到一个授权页(OAuth)。用户需要登录并授权我们的应用程序访问他们的文件。一个令牌会生成以供进一步操作。然后,我们可以上传扫描文件。
上传到Dropbox
我们使用官方的Dropbox SDK for Javascript上传文件。
-
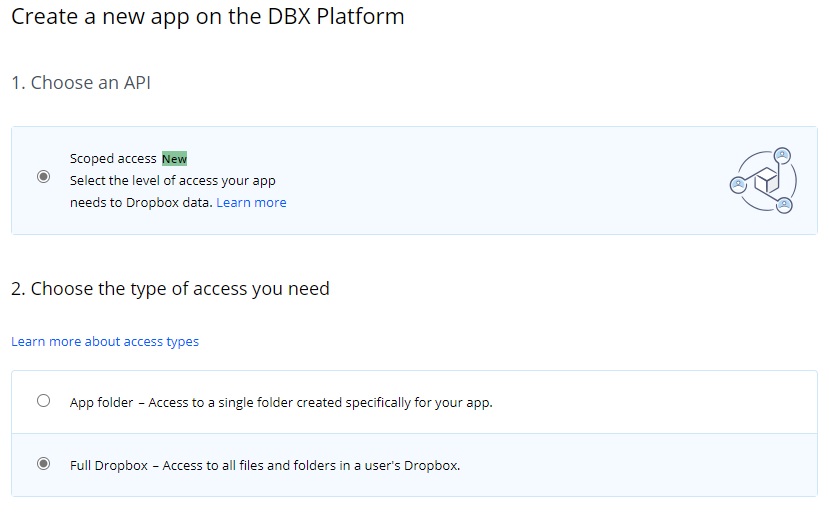
在DBX平台上创建应用程序。
-
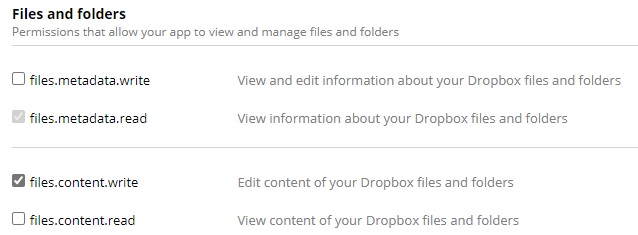
启用文件写入(File Write)权限。
-
在HTML文件中,添加与授权相关的代码。
HTML:
<a href="" id="dropbox-authlink" target="_blank" class="button" style="display:none;">Authenticate</a>JavaScript:
function LoadDropboxAuthHref(){
    // Set the login anchors href using dbx.getAuthenticationUrl()
    var CLIENT_ID = '0xmo16xy0ki1tbd';
    var dbx = new Dropbox.Dropbox({ clientId: CLIENT_ID });
    var redirectUri = window.location.href+'auth.html';
    var authUrl = dbx.auth.getAuthenticationUrl(redirectUri)
      .then((authUrl) => {
        document.getElementById('dropbox-authlink').href = authUrl;
      }
    )
}
该代码将生成到授权页面的 href。client id只是app key的另一个名称,我们可以在 DBX 平台上找到它。
-
为重定向创建一个新文件:auth.html。
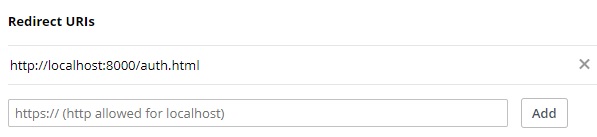
在用户授予访问权限之后,他将被重定向到预定义的重定向URI,我们可以根据这个URL获得访问令牌。我们创建的auth.html可以解析URL并将令牌保存在cookie中。其内容如下:
<html>
<head>
    <title>Auth</title>
    <script src="utils.js"></script>
    <meta name="viewport" content="width=device-width,initial-scale=1.0,maximum-scale=1.0,user-scalable=0" />
</head>
<body>
    <p>Please close the page.</p>
    <script type="text/javascript">
        // Parses the url and gets the access token if it is in the urls hash
        var token = utils.parseQueryString(window.location.hash).access_token;
        var expires_in = utils.parseQueryString(window.location.hash).expires_in;
        var expires = new Date().getTime()+parseInt(expires_in);

        if (!!token){
            document.cookie="dropbox_expires="+expires+";";
            document.cookie="dropbox_token="+token+";";
            alert("You have been authorized.");
        }else{
            alert("You have not been authorized.");
        }
        window.close();
    </script>
</body>
</html>
我们需要在DBX平台中定义重定向URI:
-
上传文件。
将扫描的文档转换为PDF文件并上传到Dropbox。
如果没有有效的访问令牌,将要求用户进行授权。
function ConvertAndUpload(value){
     var indices = imageIndices();
     var filename = getFormattedDate()+".pdf";
     if (isAuthenticated()){
         DWObject.ConvertToBlob(
             indices,
             Dynamsoft.DWT.EnumDWT_ImageType.IT_PDF,
             function(result, indices, type) {
                 UploadPDFtoDropbox(result,filename);
             },
             function(errorCode, errorString) {
                 console.log(errorString);
             }
         );
     }else{
         alert("Please authorize first.");
         document.getElementById("dropbox-authlink").click();
     }
 }

 function UploadPDFtoDropbox(blob,filename){
     var file = new File([blob], filename,{type:"application/pdf", lastModified:new Date().getTime()});
     var ACCESS_TOKEN = getAccessTokenFromCookie();
     var dbx = new Dropbox.Dropbox({ accessToken: ACCESS_TOKEN });
     dbx.filesUpload({path: '/' + file.name, contents: file})
       .then(function(response) {
         alert('File uploaded!');
         console.log(response);
   })
   .catch(function(error) {
     console.error(error);
   });
 }
上传到Onedrive
我们使用Microsoft Graph API上传文件。
-
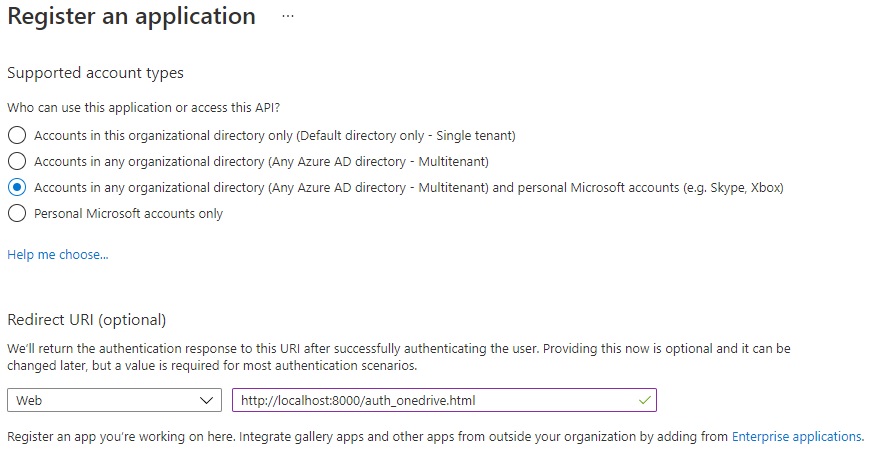
在Azure应用程序注册页面上创建应用程序。
它也需要一个重定向URI。这里,我们将URI设置为http://localhost:8000/auth_onedrive.html。
-
转到平台配置(Platform configurations)。启用访问令牌。

-
在HTML文件中,添加与授权相关的代码。
HTML:
<a href="" id="onedrive-authlink" target="_blank" class="button" style="display:none;">Authenticate</a>JavaScript:
function LoadOnedriveAuthHref(){ var CLIENT_ID = '2dfb77f2-ed6e-4a06-8219-1d3140b1a30e'; var redirectUri = window.location.href+"auth_onedrive.html"; var authurl = "https://login.microsoftonline.com/common/oauth2/v2.0/authorize?client_id="+CLIENT_ID+"&scope=Files.ReadWrite.All&response_type=token&redirect_uri="+redirectUri; document.getElementById('onedrive-authlink').href = authurl; } -
为重定向创建一个新文件:auth_onedrive.html。内容与Dropbox的版本大致相同。
-
上传文件。
要上传大文件,我们需要先创建一个上传会话,然后再上传它们。
function UploadLargeFileToOnedrive(blob,filename){
    var ACCESS_TOKEN = getAccessTokenFromCookie("onedrive");
    var endpoint = "https://graph.microsoft.com/v1.0"
    var url = endpoint+"/me/drive/root:/ScannedDocuments/"+filename+":/createUploadSession";
    var xhr = new XMLHttpRequest();
    xhr.open("POST", url);
    xhr.setRequestHeader("Authorization", "Bearer " + ACCESS_TOKEN);
    xhr.onreadystatechange = function () {
       if (xhr.readyState === 4) {
          console.log(xhr.status);
          console.log(xhr.responseText);
          if (xhr.status==200){
              UploadToSession(JSON.parse(xhr.responseText).uploadUrl,blob,filename);
          }
       }};
    xhr.send();
}

function UploadToSession(session,blob,filename){
    var ACCESS_TOKEN = getAccessTokenFromCookie("onedrive");
    var file = new File([blob], filename,{type:"application/pdf", lastModified:new Date().getTime()});
    var xhr = new XMLHttpRequest();
    xhr.open("PUT", session);
    xhr.setRequestHeader("Authorization", "Bearer " + ACCESS_TOKEN);
    xhr.setRequestHeader("Content-Length", file.size);
    xhr.setRequestHeader("Content-Range", "bytes 0-"+(file.size-1)+"/"+file.size);

    xhr.onreadystatechange = function () {
       if (xhr.readyState === 4) {
          console.log(xhr.status);
          console.log(xhr.responseText);
          if (xhr.status==201){
              alert("uploaded");
          }else{
              alert("failed");
          }
       }};
    xhr.send(blob);
}