
Dynamic Web TWAIN是一个给Web应用添加文档扫描功能的SDK。它会在本地运行一个叫Dynamsoft Service的后端服务,通过TWAIN、WIA、eSCL、SANE和ICA等协议与扫描仪进行通信。该服务是跨平台的,可以在Windows、macOS和Linux上运行。
从Dynamic Web TWAIN v18.4开始,可以通过REST API访问Dynamsoft Service,以便我们可以用不同的编程语言创建文档扫描应用程序。
在本文中,我们将讨论如何使用Java通过这一REST API调用文档扫描仪。使用JavaFX构建了一个桌面应用程序。
使用Dynamsoft Service的REST API在Java中进行文档扫描的一些优点:
- 它是跨平台的,支持多种扫描协议。
- 如果我们直接调用TWAIN API ,我们需要使用32位的JRE,因为大多数驱动程序都是32位。使用REST API就没有此问题。
准备工作
- 需要申请一个Dynamic Web TWAIN的许可证来使用它。可以在这里申请。
- 需要在设备上安装Dynamsoft Service。可以在下表中找到下载链接:
REST API概览
端点:http://127.0.0.1:18622。可以访问配置页面http://127.0.0.1:18625/对IP等内容进行配置。如果设置了局域网IP,那局域网内其它设备也可以通过安装了Dynamsoft Service的这台设备来扫描文档。不设的话则默认只开放给本机。
API接口:
-
列出扫描仪。
HTTP方法和URL:
GET /DWTAPI/Scanners响应示例:
[
  {
    "name":"scanner name",
    "device":"detailed info of the scanner",
    "type": 16
  }
]
以下是扫描仪类型及其相应值的列表。
16: TWAIN 32: WIA 64: TWAINX64 128: ICA 256: SANE 512: eSCL 1024: WIFIDIRECT 2048: WIATWAIN -
创建文档扫描作业。
HTTP方法和URL:
POST /DWTAPI/ScanJobs请求示例:
{
  "license":"license of Dynamic Web TWAIN",
  "device":"detailed info of the scanner", #optional. Use the latest device by default
  "config":{ # Device configuration https://www.dynamsoft.com/web-twain/docs/info/api/Interfaces.html#DeviceConfiguration (optional)
    "IfShowUI":true, # show the UI of the scanner
    "Resolution":200,
    "IfFeederEnabled":false, # enable auto document feeder
    "IfDuplexEnabled":false # enable duplex document scanning
  },
  "caps":{ # Capabilities https://www.dynamsoft.com/web-twain/docs/info/api/Interfaces.html#capabilities (optional)
    "exception":"ignore",
    "capabilities":[
      {
        "capability":"", #pixel type
        "curValue":0 #0: black&white, 1: gray, 2: color
      }
    ]
  }
}
响应:
状态码201,返回作业ID
-
获取扫描的文档图像。
HTTP方法和URL:
GET /DWTAPI/ScanJobs/:jobid/NextDocument响应:
状态码200,返回图像的字节
-
获取扫描作业的信息。
HTTP方法和URL:
GET /DWTAPI/ScanJobs/:jobid/DocumentInfo -
删除扫描作业。
HTTP方法和URL:
DELETE /DWTAPI/ScanJobs/:jobid
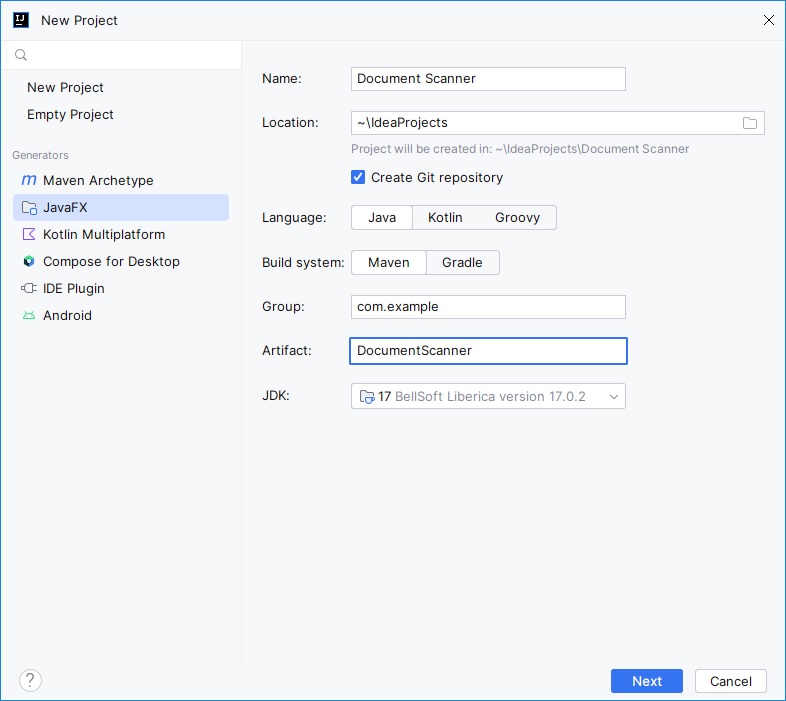
新建JavaFX项目
使用IntelliJ IDEA创建新的JavaFX项目。
添加依赖项
在pom.xml中添加OKHttp作为HTTP库。OKHttp适用于桌面和安卓平台。
<dependency>
    <groupId>com.squareup.okhttp3</groupId>
    <artifactId>okhttp</artifactId>
    <version>4.11.0</version>
</dependency>
在pom.xml中添加Jackson作为JSON库。
<dependency>
    <groupId>com.fasterxml.jackson.core</groupId>
    <artifactId>jackson-core</artifactId>
    <version>2.15.2</version>
</dependency>
<dependency>
    <groupId>com.fasterxml.jackson.core</groupId>
    <artifactId>jackson-databind</artifactId>
    <version>2.15.2</version>
</dependency>
此外,添加PDFBox以将扫描的文档保存为PDF文件。
<dependency>
    <groupId>org.apache.pdfbox</groupId>
    <artifactId>pdfbox</artifactId>
    <version>3.0.0</version>
</dependency>
创建表示数据的类
-
扫描设备类Scanner。
public class Scanner { public String name; public int type; public String device; public Scanner(String name, int type, String device){ this.name = name; this.type = type; this.device = device; } } -
设备类型常量。
public class DeviceType { public static final int TWAIN = 16; public static final int WIA = 32; public static final int TWAINX64 = 64; public static final int ICA = 128; public static final int SANE = 256; public static final int ESCL = 512; public static final int WIFIDIRECT = 1024; public static final int WIATWAIN = 2048; public static String getDisplayName(int type) throws Exception { if (type == TWAIN) { return "TWAIN"; }else if (type == WIA) { return "WIA"; }else if (type == TWAINX64) { return "TWAINX64"; }else if (type == ICA) { return "ICA"; }else if (type == SANE) { return "SANE"; }else if (type == ESCL) { return "ESCL"; }else if (type == WIFIDIRECT) { return "WIFIDIRECT"; }else if (type == WIATWAIN) { return "WIATWAIN"; }else{ throw new Exception("Invalid type"); } } } -
设备配置。
public class DeviceConfiguration { public boolean IfShowUI = false; public int Resolution = 200; public boolean IfFeederEnabled = false; public boolean IfDuplexEnabled = false; } -
扫描功能的设置。
public class CapabilitySetup { public int capability; public Object curValue; public String exception = "ignore"; } -
扫描功能。
public class Capabilities {
    public String exception = "";
    public List<CapabilitySetup> capabilities = new ArrayList<CapabilitySetup>();
}
Dynamsoft Service类
创建一个新的Dynamsoft Service类,用于调用REST API。
-
创建一个类,基本内容如下。
public class DynamsoftService { private String endPoint = "http://127.0.0.1:18622"; private String license = ""; public DynamsoftService(){ } public DynamsoftService(String endPoint, String license){ this.endPoint = endPoint; this.license = license; } } -
添加
getScanners方法以获取扫描仪列表。public List<Scanner> getScanners() throws IOException, InterruptedException { OkHttpClient client = new OkHttpClient(); Request request = new Request.Builder() .url(endPoint+"/DWTAPI/Scanners") .build(); try (Response response = client.newCall(request).execute()) { String body = response.body().string(); List<Scanner> scanners = new ArrayList<Scanner>(); ObjectMapper objectMapper = new ObjectMapper(); List<Map<String,Object>> parsed = objectMapper.readValue(body,new TypeReference<List<Map<String,Object>>>() {}); for (Map<String,Object> item:parsed) { int type = (int) item.get("type"); String name = (String) item.get("name"); String device = (String) item.get("device"); Scanner scanner = new Scanner(name,type,device); scanners.add(scanner); } return scanners; } } -
添加
createScanJob方法,以创建扫描作业。public String createScanJob(Scanner scanner) throws Exception { return createScanJob(scanner,null,null); } public String createScanJob(Scanner scanner,DeviceConfiguration config,Capabilities capabilities) throws Exception { Map<String,Object> body = new HashMap<String,Object>(); body.put("license",this.license); body.put("device",scanner.device); if (config != null) { body.put("config",config); } if (capabilities != null) { body.put("caps",capabilities); } ObjectMapper objectMapper = new ObjectMapper(); String jsonBody = objectMapper.writeValueAsString(body); OkHttpClient client = new OkHttpClient.Builder() .connectTimeout(120, TimeUnit.SECONDS) .build(); RequestBody requestBody = RequestBody.create(jsonBody, JSON); Request request = new Request.Builder() .url(endPoint+"/DWTAPI/ScanJobs?timeout=120") .post(requestBody) .build(); try (Response response = client.newCall(request).execute()) { if (response.code() == 201) { return response.body().string(); }else{ throw new Exception(response.body().string()); } } } -
添加一个
nextDocument方法来获取文档图像。public byte[] nextDocument(String jobID) throws Exception { return getImage(jobID); } private byte[] getImage(String jobID) throws Exception { OkHttpClient client = new OkHttpClient.Builder() .connectTimeout(120, TimeUnit.SECONDS) .build(); Request request = new Request.Builder() .url(endPoint+"/DWTAPI/ScanJobs/"+jobID+"/NextDocument?timeout=120") .build(); String body = ""; try (Response response = client.newCall(request).execute()) { if (response.code() == 200) { return response.body().bytes(); }else{ return null; } } }
给应用添加扫描功能
接下来,我们可以更新primary stage,给它添加扫描功能。
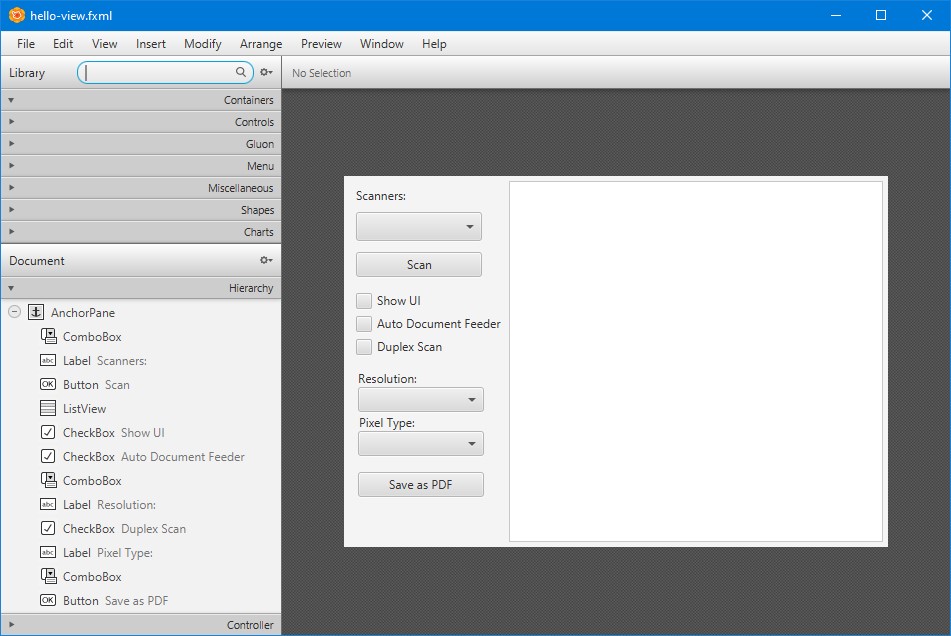
首先,我们可以使用SceneBuilder用FXML设计布局。左侧是用于配置扫描的控件,右侧是用于显示扫描图像的ListView。
然后,在控制器中实现相关事件和初始化。
-
在初始化过程中,在组合框中加载扫描仪、分辨率和像素类型的列表。
public void initialize(){ this.loadResolutions(); this.loadPixelTypes(); this.loadScanners(); } private void loadResolutions(){ List<Integer> resolutions = new ArrayList<Integer>(); resolutions.add(100); resolutions.add(200); resolutions.add(300); resolutionComboBox.setItems(FXCollections.observableList(resolutions)); resolutionComboBox.getSelectionModel().select(1); } private void loadPixelTypes(){ List<String> pixelTypes = new ArrayList<String>(); pixelTypes.add("Black & White"); pixelTypes.add("Gray"); pixelTypes.add("Color"); pixelTypeComboBox.setItems(FXCollections.observableList(pixelTypes)); pixelTypeComboBox.getSelectionModel().select(0); } private void loadScanners() throws IOException, InterruptedException { scanners = service.getScanners(); List<String> names = new ArrayList<String>(); for (Scanner scanner:scanners) { try { names.add(scanner.name + " (" +DeviceType.getDisplayName(scanner.type)+ ")"); } catch (Exception e) { System.out.println(e.getMessage()); } } scannersComboBox.setItems(FXCollections.observableList(names)); if (names.size()>0) { scannersComboBox.getSelectionModel().select(0); } } -
为
ListView的单元格定义DocumentImage类。ListView的单元格包含一个ImageView。public class DocumentImage { public ImageView imageView; public byte[] image; public DocumentImage(ImageView imageView,byte[] image) { this.imageView = imageView; this.image = image; } } -
更新ListView的单元格工厂,使其显示ImageView。
documentListView.setCellFactory(param -> new ListCell<DocumentImage>() { { prefWidthProperty().bind(documentListView.widthProperty().subtract(30)); setMaxWidth(Control.USE_PREF_SIZE); } @Override protected void updateItem(DocumentImage item, boolean empty) { super.updateItem(item, empty); if (empty) { setGraphic(null); } else { item.imageView.setFitWidth(documentListView.widthProperty().subtract(30).doubleValue()); setGraphic(item.imageView); } } }); -
单击扫描按钮后扫描文档。图像将显示在ListView中。
@FXML protected void onScanButtonClicked() { int selectedIndex = scannersComboBox.getSelectionModel().getSelectedIndex(); if (selectedIndex != -1) { progressStage.show(); Thread t = new Thread(() -> { Scanner scanner = scanners.get(selectedIndex); try { DeviceConfiguration config = new DeviceConfiguration(); config.IfShowUI = showUICheckBox.isSelected(); config.IfDuplexEnabled = duplexCheckBox.isSelected(); config.IfFeederEnabled = ADFCheckBox.isSelected(); config.Resolution = (int) resolutionComboBox.getSelectionModel().getSelectedItem(); Capabilities caps = new Capabilities(); caps.exception = "ignore"; caps.capabilities = new ArrayList<CapabilitySetup>(); CapabilitySetup pixelTypeSetup = new CapabilitySetup(); pixelTypeSetup.capability = 257; pixelTypeSetup.curValue = pixelTypeComboBox.getSelectionModel().getSelectedIndex(); caps.capabilities.add(pixelTypeSetup); String jobID = service.createScanJob(scanner,config,caps); System.out.println("ID: "+jobID); byte[] image = service.nextDocument(jobID); while (image != null){ loadImage(image); image = service.nextDocument(jobID); } } catch (Exception e) { System.out.println(e.getMessage()); } Platform.runLater(() -> { progressStage.close(); }); }); t.start(); } } private void loadImage(byte[] image){ Image img = new Image(new ByteArrayInputStream(image)); ImageView iv = new ImageView(); iv.setPreserveRatio(true); iv.setImage(img); DocumentImage di = new DocumentImage(iv,image); documentListView.getItems().add(di); } -
监听ListView宽度的变化。当宽度更改时,更新ImageView的大小。
ChangeListener<Number> changeListener = new ChangeListener<Number>() { @Override public void changed(ObservableValue<? extends Number> observable, Number oldValue, Number newValue) { for (DocumentImage item:documentListView.getItems()) { item.imageView.setFitWidth(documentListView.widthProperty().subtract(30).doubleValue()); } } }; documentListView.widthProperty().addListener(changeListener); -
为ListView添加用于删除所选文档图像的右键菜单。
ContextMenu contextMenu = new ContextMenu(); MenuItem deleteMenuItem = new MenuItem("Delete selected"); deleteMenuItem.setOnAction(e -> { var indices = documentListView.getSelectionModel().getSelectedIndices(); for (int i = indices.size() - 1; i >= 0; i--) { int index = indices.get(i); documentListView.getItems().remove(index); } }); contextMenu.getItems().add(deleteMenuItem); -
使用PDFBox将扫描的文档保存为PDF文件。
@FXML
protected void onSaveButtonClicked() throws IOException {
    FileChooser fileChooser = new FileChooser();
    fileChooser.setTitle("Open Resource File");
    File fileToSave = fileChooser.showSaveDialog(null);
    if (fileToSave != null) {
        PDDocument document = new PDDocument();
        int index = 0;
        for (DocumentImage di: documentListView.getItems()) {
            index = index + 1;
            ImageView imageView = di.imageView;
            PDRectangle rect = new PDRectangle((float) imageView.getImage().getWidth(),(float) imageView.getImage().getHeight());
            System.out.println(rect);
            PDPage page = new PDPage(rect);
            document.addPage(page);
            PDPageContentStream contentStream = new PDPageContentStream(document, page);
            PDImageXObject image
                    = PDImageXObject.createFromByteArray(document,di.image,String.valueOf(index));
            contentStream.drawImage(image, 0, 0);
            contentStream.close();
        }
        document.save(fileToSave.getAbsolutePath());
        document.close();
    }
}
好了,我们现在已经完成了demo应用程序的编写。
源代码
欢迎下载源代码并尝试使用:
https://github.com/tony-xlh/JavaFX-Document-Scanner
可以使用Jitpack将封装好的类集成到自己的项目中:https://jitpack.io/#tony-xlh/docscan4j