
在上一篇文章中,我们简要演示了如何使用capacitor-plugin-dynamsoft-barcode-reader构建跨平台二维码扫描应用。在本文中,我们将使用Ionic React来构建一个二维码扫描应用。
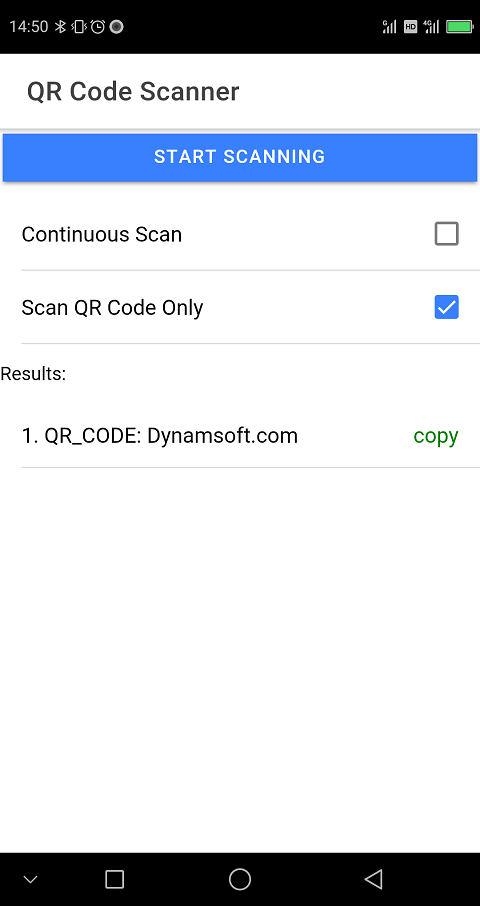
最终结果的预览:

应用使用IonReactRouter管理导航。它有两个页面:主页和扫描页面。在主页,用户可以将扫描结果复制到剪贴板,配置是否只扫描QR二维码,是否启用连续扫描。在扫描页面,它还可以执行以下操作以完成扫码:
- 选择摄像头
- 选择摄像头分辨率
- 设置扫描区域
- 触摸对焦
- 打开闪光灯
- 放大和缩小
- 标注识别到的二维码
这个Capacitor插件基于Dynamsoft Barcode Reader和Dynamsoft Camera Enhancer实现。
编写Ionic React二维码扫描应用
下面是分步过程。
新建项目
创建新的Ionic React应用:
ionic start qr-code-scanner tabs --type=react --capacitor
我们可以启动服务器在浏览器中进行实时测试:
ionic serve
在Android上运行:
ionic capacitor add android
ionic capacitor copy android // sync files
ionic capacitor run android
在iOS上运行:
ionic capacitor add ios
ionic capacitor copy ios // sync files
ionic capacitor open ios // use XCode to open the project
添加摄像头权限
对于iOS,将以下内容添加到ios\App\App\Info.plist:
<key>NSCameraUsageDescription</key>
<string>For barcode scanning</string>
安装依赖项
我们需要为项目安装一些额外的包:
npm install capacitor-plugin-dynamsoft-barcode-reader copy-to-clipboard
编写二维码扫描组件
React是声明式的,但我们要用的插件只提供命令式API。我们需要创建一个二维码扫描组件,以便以声明性的方式使用插件。
以下是组件的完整代码(文件另存为src\components\ QRCodeScanner. tsx):
import { DBR, ScanRegion } from 'capacitor-plugin-dynamsoft-barcode-reader';
import { useEffect } from 'react';

const QRCodeScanner = (props: { isActive: boolean;
  cameraID?: string;
  resolution?: number;
  torchOn?: boolean;
  zoom?: number;
  scanRegion?:ScanRegion}) => {

  useEffect(() => {
    return ()=>{
      console.log("unmount and stop scan");
      DBR.stopScan();
    }
  }, []);

  useEffect(() => {
    console.log("update active");
    if (props.isActive) {
      DBR.startScan();
    }else{
      DBR.stopScan();
    }
  }, [props.isActive]);

  useEffect(() => {
    if (props.torchOn != undefined) {
      if (props.torchOn == true) {
        console.log("torch on");
        DBR.toggleTorch({"on":true});
      }else{
        console.log("torch off");
        DBR.toggleTorch({"on":false});
      }
    }
  }, [props.torchOn]);

  useEffect(() => {
    if (props.zoom != undefined) {
      DBR.setZoom({factor:props.zoom});
    }
  }, [props.zoom]);

  useEffect(() => {
    const selectCamera = async () => {
      if (props.cameraID != undefined && props.cameraID != "") {
        let result = await DBR.getSelectedCamera();
        if (result.selectedCamera) {
          if (result.selectedCamera == props.cameraID){
            return;
          }
        }
        DBR.selectCamera({cameraID:props.cameraID});
      }
    }
    selectCamera();
  }, [props.cameraID]);

  useEffect(() => {
    if (props.scanRegion != undefined) {
      DBR.setScanRegion(props.scanRegion);
    }
  }, [props.scanRegion]);

  useEffect(() => {
    if (props.resolution != undefined) {
      let res:number = Math.floor(props.resolution);
      DBR.setResolution({resolution:res});
    }
  }, [props.resolution]);

  return (
    <div></div>
  );
}

export default QRCodeScanner;
在这里,我们创建了一个函数式组件。有几个需要注意的点。
- 由于该插件将在WebView下方创建一个原生的摄像头视图,并将WebView的背景设置为透明,以便我们可以自定义UI,因此我们只将
<div></div>作为占位符返回。 useEffect用于监听组件是否挂载或更新。- 一些命令式API,如
setFocus更适合以命令式方式使用,因此它们不作为组件的属性添加。
创建主页和扫描页面
- 在
src\pages目录下创建Home.tsx和Scanner.tsx文件。 - 在
App.tsx中,用IonReactRouter管理导航。
const App: React.FC = () => {
  return (
    <IonApp style={{zIndex:999}}>
    <IonReactRouter>
      <IonRouterOutlet>
        <Route path="/home" component={Home} exact={true} />
        <Route path="/scanner" component={Scanner} exact={true} />
        <Route exact path="/" render={() => <Redirect to="/home" />} />
      </IonRouterOutlet>
    </IonReactRouter>
  </IonApp>
  );
}

export default App;
我们需要为IonApp设置z-index,因为Web端的扫描界面将显示一个会覆盖其他元素的全屏元素,它是绝对位置定位的。
编写主页
在主页中,创建一个Start Scanning按钮和两个复选框。
const [continuousScan, setContinuousScan] = useState(false);
const [QRcodeOnly, setQRcodeOnly] = useState(true);

const handleOption = (e: any) => {
  let value = e.detail.value;
  let checked = e.detail.checked;
  if (value == "Continuous Scan") {
    setContinuousScan(checked)
  } else if (value == "Scan QR Code Only") {
    setQRcodeOnly(checked);
  }
}

//......

<IonButton expand="full" onClick={startScan}>Start Scanning</IonButton>
<IonList>
  <IonItem>
    <IonLabel>Continuous Scan</IonLabel>
    <IonCheckbox slot="end" value="Continuous Scan" checked={continuousScan} onIonChange={(e) => handleOption(e)}/>
  </IonItem>
  <IonItem>
    <IonLabel>Scan QR Code Only</IonLabel>
    <IonCheckbox slot="end" value="Scan QR Code Only" checked={QRcodeOnly} onIonChange={(e) => handleOption(e)}/>
  </IonItem>
</IonList>
按下Start Scanning按钮时,它将导航到扫描页面,并传递continuous scan,qrcodeonly和active属性。
const startScan = () => {
  props.history.push("scanner",{continuousScan:continuousScan,qrcodeOnly:QRcodeOnly,active:true})
}
如果禁用连续扫描,扫描页面将在检测到二维码时将码的结果返回主页。我们可以将它们显示在列表中,并使其可复制。
const [present, dismiss] = useIonToast();
const [barcodeResults, setBarcodeResults] = useState([] as TextResult[]);
const copyBarcode = (text:string) => {
  if (copy(text)){
    present("copied",500);
  }
}

//......

{(barcodeResults.length>0) &&
  <IonListHeader>
    <IonLabel>Results:</IonLabel>
  </IonListHeader>
}
{barcodeResults.map((tr,idx) => (
  <IonItem key={idx}>
    <IonLabel>{tr.barcodeFormat + ": " + tr.barcodeText}</IonLabel>
    <IonLabel style={{color:"green"}} slot="end" onClick={() =>{copyBarcode(tr.barcodeText)}}>copy</IonLabel>
  </IonItem>
))}
编写扫描页面
添加二维码扫描组件
-
在JSX中添加二维码扫描组件:
if (initialized == false) { return <IonPage><p>Initializing</p></IonPage> } return ( <IonPage> <QRCodeScanner isActive={isActive} /> </IonPage> ); -
在页面装载时初始化插件,并在页面卸载时停止扫描。这里需要申请试用许可证才能正常使用插件。
const [initialized,setInitialized] = useState(false);
const [isActive,setIsActive] = useState(false);

useEffect(() => {
    console.log("on mount");
    const state = props.location.state as { continuousScan: boolean; qrcodeOnly: boolean; active: boolean; };

    if (state && state.active != true) {
      return;
    }

    async function init() {
      let result = await DBR.initialize(); // To use your license: DBR.initialize({license: <your license>})
      if (result) {
        if (result.success == true) {
          setQRCodeRuntimeSettings(state.qrcodeOnly);
          setInitialized(true);
          setIsActive(true);
        }
      }
    }
    init();

    return ()=>{
      console.log("unmount");
      setIsActive(false);
    }
  }, []);
修改运行时设置以只扫描QR二维码
Dynamsoft Barcode Reader提供了丰富的参数来调整其行为。我们可以使用JSON模板,较方便地对其进行修改。
如果启用了仅扫描QR选项,我们可以执行以下操作来修改运行时设置:
const setQRCodeRuntimeSettings = async (qrcodeOnly:boolean) => {
  if (qrcodeOnly == true) {
    let template = "{\"ImageParameter\":{\"BarcodeFormatIds\":[\"BF_QR_CODE\"],\"Description\":\"\",\"Name\":\"Settings\"},\"Version\":\"3.0\"}";  //decode QR code only
    await DBR.initRuntimeSettingsWithString({template:template})
  } else{
    let template = "{\"ImageParameter\":{\"BarcodeFormatIds\":[\"BF_ALL\"],\"Description\":\"\",\"Name\":\"Settings\"},\"Version\":\"3.0\"}"; //decode all barcode formats
    await DBR.initRuntimeSettingsWithString({template:template})
  }
}
在此处了解有关运行时设置的更多信息。
添加onFrameRead和onPlayed Listener监听器
添加读到条码时触发的onFrameRead监听器,以及摄像头状态切换时触发的onPlayed监听器。
注意在卸载页面时,需要移除监听器。
let scanned = false;
let frameReadListener:PluginListenerHandle|undefined;
let onPlayedListener:PluginListenerHandle|undefined;

const Scanner = (props:RouteComponentProps) => {
  useEffect(() => {
    console.log("on mount");
    async function init() {
      let result = await DBR.initialize();
      if (result) {
        if (result.success == true) {
          removeListeners();
          frameReadListener = await DBR.addListener('onFrameRead', async (scanResult:ScanResult) => {
            let results = scanResult["results"];
            if (state.continuousScan == true) {
              setBarcodeResults(results);
            }else{
              if (results.length>0 && scanned == false) {
                scanned = true;
                props.history.replace({ state: {results:results,active:false} });
                props.history.goBack();
              }
            }
          });
          onPlayedListener = await DBR.addListener("onPlayed", (result:{resolution:string}) => {
            console.log(resolution);
          });
          setQRCodeRuntimeSettings(state.qrcodeOnly);
          setInitialized(true);
          setIsActive(true);
        }
      }
    }
    init();
    scanned = false;

    return ()=>{
      console.log("unmount");
      setIsActive(false);
      removeListeners();
    }
  }, []);

  const removeListeners = () => {
    if (frameReadListener) {
      frameReadListener.remove();
    }
    if (onPlayedListener) {
      onPlayedListener.remove();
    }
  }
}
绘制二维码高亮覆盖图
在连续扫描模式下,我们可以绘制二维码高亮覆盖图,以显示检测到的二维码。
我们可以使用SVG来实现这一功能,如何实现在之前一篇文章中有讨论过。
-
在JSX中添加SVG元素:
const [viewBox,setViewBox] = useState("0 0 1920 1080");

//......

<svg
  viewBox={viewBox}
  className="overlay"
  xmlns="<http://www.w3.org/2000/svg>"
>
</svg>
SVG元素的样式:
.overlay { top: 0; left: 0; position: absolute; width: 100%; height: 100%; z-index: 998; } -
viewBox属性应与视频帧大小匹配。我们可以从onPlayed事件获取大小。let currentWidth = 1920; let currentHeight = 1080; onPlayedListener = await DBR.addListener("onPlayed", (result:{resolution:string}) => { const resolution: string = result.resolution; //1920x1080 currentWidth = parseInt(resolution.split("x")[0]); currentHeight = parseInt(resolution.split("x")[1]); updateViewBox(); }); const updateViewBox = () => { let box:string = "0 0 "+currentWidth+" "+currentHeight; setViewBox(box); } -
添加Polygon多边形和Text文本SVG元素
<svg
  viewBox={viewBox}
  className="overlay"
  xmlns="<http://www.w3.org/2000/svg>"
>
  {barcodeResults.map((tr,idx) => (
    <polygon key={"poly-"+idx} xmlns="<http://www.w3.org/2000/svg>"
    points={getPointsData(tr)}
    className="barcode-polygon"
    />
  ))}
  {barcodeResults.map((tr,idx) => (
    <text key={"text-"+idx} xmlns="<http://www.w3.org/2000/svg>"
    x={tr.x1}
    y={tr.y1}
    fill="red"
    fontSize="20"
    >{tr.barcodeText}</text>
  ))}
</svg>
插件返回的条码结果具有以下定位属性,可用于确定多边形和文本元素的位置:
x1、x2、x3、x4、y1、y2、y3、y4。getPointsData函数:const getPointsData = (lr:TextResult) => { let pointsData = lr.x1 + "," + lr.y1 + " "; pointsData = pointsData + lr.x2+ "," + lr.y2 + " "; pointsData = pointsData + lr.x3+ "," + lr.y3 + " "; pointsData = pointsData + lr.x4+ "," + lr.y4; return pointsData; } -
处理旋转
我们需要处理的另一个问题是旋转。图像传感器的默认方向是横向的,而设备通常是纵向的。为了在屏幕上显示,视频帧通常需要旋转90度。
onFrameRead事件将返回条码结果、设备的方向和帧的旋转角度。我们可以用这些信息来处理旋转。-
如果设备是纵向的,则颠倒viewBox的高度和宽度。
const updateViewBox = (deviceOrientation?:string) => { let box:string = "0 0 "+currentWidth+" "+currentHeight; if (deviceOrientation && deviceOrientation == "portrait") { box = "0 0 "+currentHeight+" "+currentWidth; } setViewBox(box); } -
根据帧方向和设备方向更新定位结果。
const handleRotation = (result:any, orientation: string, rotation:number) => { let width,height; if (orientation == "portrait") { width = currentHeight; height = currentWidth; }else{ width = currentWidth; height = currentHeight; } const frontCam:boolean = isFront(); console.log("front cam: "+frontCam); for (let i = 1; i < 5; i++) { let x = result["x"+i]; let y = result["y"+i]; let rotatedX; let rotatedY; switch (rotation) { case 0: rotatedX = x; rotatedY = y; if (frontCam == true){ //front cam landscape rotatedX = width - rotatedX; } break; case 90: rotatedX = width - y; rotatedY = x; if (frontCam == true){ //front cam portrait rotatedY = height - rotatedY; } break; case 180: rotatedX = width - x; rotatedY = height - y; if (frontCam == true){ //front cam landscape rotatedX = width - rotatedX; } break; case 270: rotatedX = height - y; rotatedY = width - x; if (frontCam == true){ //front cam portrait rotatedY = height - rotatedY; } break; default: rotatedX = x; rotatedY = y; } result["x"+i] = rotatedX; result["y"+i] = rotatedY; } } -
上述函数在
onFrameRead事件中执行。frameReadListener = await DBR.addListener('onFrameRead', async (scanResult:ScanResult) => { let results = scanResult["results"]; if (scanResult.deviceOrientation) { updateViewBox(scanResult.deviceOrientation); } if (state.continuousScan == true) { if (scanResult.frameOrientation != undefined && scanResult.deviceOrientation != undefined) { for (let index = 0; index < results.length; index++) { handleRotation(results[index], scanResult.deviceOrientation, scanResult.frameOrientation); } } setBarcodeResults(results); } });
-
摄像头选择
-
在JSX中添加摄像头选择项:
let selectedCam = ""; const Scanner = (props:RouteComponentProps) => { const [cameras,setCameras] = useState([] as string[]); const [cameraID,setCameraID] = useState(""); //...... {isActive && <div> <select value={cameraID} className="camera-select controls" onChange={(e) => onCameraSelected(e)}> {cameras.map((camera,idx) => ( <option key={idx} value={camera}> {camera} </option> ))} </select> </div> } -
初始化插件后加载相机列表:
async function init() { let result = await DBR.initialize(); console.log(result); if (result) { if (result.success == true) { //...... loadCameras(); setInitialized(true); setIsActive(true); } } } //...... const loadCameras = async () => { let result = await DBR.getAllCameras(); if (result.cameras){ setCameras(result.cameras); } } -
使用二维码扫描组件的
cameraID属性使其生效。<QRCodeScanner isActive={isActive} + cameraID={cameraID} />
分辨率选择
-
在JSX中添加分辨率选择项:
let presetResolutions = [{label:"ask 480P",value:EnumResolution.RESOLUTION_480P},
                       {label:"ask 720P",value:EnumResolution.RESOLUTION_720P},
                       {label:"ask 1080P",value:EnumResolution.RESOLUTION_1080P}]

const Scanner = (props:RouteComponentProps) => {
  const [cameraResolution,setCameraResolution] = useState(undefined); //do not set up resolution at the beginning
  const [resolutionLabel,setResolutionLabel] = useState("");

  //......

  {isActive &&
  <div>
    <select value={resolutionLabel} className="resolution-select controls" onChange={(e) => onResolutionSelected(e)}>
          <option>
          {"got "+resolutionLabel}
          </option>
          {presetResolutions.map((res,idx) => (
            <option key={idx} value={res.value}>
              {res.label}
            </option>
          ))}
        </select>
  </div>
}
选择项将显示一个带有“ask”标签前缀的预设分辨率列表,以及一个带有“got”标签前缀的显示当前分辨率的选项。
-
在
onPlayed事件中,更新当前分辨率:onPlayedListener = await DBR.addListener("onPlayed", (result:{resolution:string}) => { const resolution: string = result.resolution; setResolutionLabel(resolution); }); -
使用二维码扫描组件的
resolution属性使其生效。<QRCodeScanner isActive={isActive} + resolution={cameraResolution} />
设置扫描区域
我们可以设置扫描区域来引导用户将摄像头对准二维码。
下面是其用法:
const [scanRegion,setScanRegion] = useState({left:10,
                                                top:20,
                                                right:90,
                                                bottom:65,
                                                measuredByPercentage:1
                                                });

<QRCodeScanner
  isActive={isActive}
  scanRegion={scanRegion}/>
触摸对焦
插件还有一个设置对焦的API。x和y的单位是百分比,范围从0.0到1.0。
setFocus(options: { x: number; y: number; }) => Promise<{ success?: boolean; message?: string; }>
我们可以为SVG元素设置onClick事件来设置对焦的焦点。如果用户点击屏幕,设置焦点,围绕点击点画一个多边形,并在1.5秒后将其删除。
const Scanner = (props:RouteComponentProps) => {
  const overlayRef = useRef<SVGSVGElement>(null);
  const [pressedX,setPressedX] = useState<number|undefined>(undefined);
  const [pressedY,setPressedY] = useState<number|undefined>(undefined);

  const onOverlayClicked = (e:any) => {
    if (overlayRef.current) {
      let x = e.clientX / overlayRef.current?.clientWidth;
      let y = e.clientY / overlayRef.current?.clientHeight;
      setPressedX(x);
      setPressedY(y);
      DBR.setFocus({x:x,y:y});
      setTimeout(() => {
        setPressedX(undefined);
        setPressedY(undefined);
      }, 1000);
    }
  }

  //......

  <svg
    viewBox={viewBox}
    className="overlay"
    ref={overlayRef}
    xmlns="<http://www.w3.org/2000/svg>"
    onClick={(e) => {onOverlayClicked(e)}}
  >
  {(pressedX!=undefined && pressedY!=undefined) &&
    <polygon xmlns="<http://www.w3.org/2000/svg>"
    points={getPointsDataForFocusHint(pressedX,pressedY)}
    className="focus-polygon"
  />
  </svg>
}
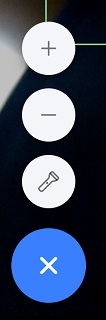
其他操作
我们还可以添加其他操作来控制摄像头。
可以使用浮动操作按钮来执行这些操作。
-
在JSX中添加元素:
<IonFab vertical="bottom" horizontal="start" slot="fixed"> <IonFabButton> <IonIcon icon={ellipsisHorizontalOutline} /> </IonFabButton> <IonFabList side="top"> <IonFabButton onClick={toggleTorch}> <IonIcon icon={flashlightOutline} /> </IonFabButton> <IonFabButton onClick={() => {setZoom(1)}}> <IonIcon icon={removeOutline} /> </IonFabButton> <IonFabButton onClick={() => {setZoom(2.5)}}> <IonIcon icon={addOutline} /> </IonFabButton> </IonFabList> </IonFab> -
将zoom和torch属性添加到二维码扫描组件:
<QRCodeScanner isActive={isActive} + zoom={zoom} + torchOn={torchOn} /> -
单击闪光灯按钮时更新闪光灯状态
const toggleTorch = () => {
  if (torchOn == false) {
    setTorchOn(true);
  }else{
    setTorchOn(false);
  }
}
浮动操作按钮的屏幕截图:
源代码
查看源代码并试用: