
OpenCV是一个开源的计算机视觉和机器学习软件库。它为我们解决不同的任务提供了各种图像处理方法。
在本文中,我们将使用OpenCV的JavaScript版本编写一个文档扫描Web应用。首先编写了一个JavaScript库,然后与Dynamsoft Document Viewer一起使用,实现一个具有实时检测、自动捕获和文档多边形编辑等功能的文档扫描应用。
演示视频:
新建项目
使用Vite创建一个新的TypeScript项目:
npm create vite@latest OpenCVDocumentScanner -- --template vanilla-ts
包含OpenCV
在用于开发测试的index.html中,包含OpenCV。
<script type="text/javascript">
  var Module = {
    // https://emscripten.org/docs/api_reference/module.html#Module.onRuntimeInitialized
    onRuntimeInitialized() {
      document.getElementById('status').innerHTML = 'OpenCV.js is ready.';
    }
  };
</script>
<script async src="https://docs.opencv.org/4.8.0/opencv.js" type="text/javascript"></script>
文档扫描类
接下来,创建一个document-scanner.ts文件。
export class DocumentScanner {
  private cv:any;
  constructor() {
    if (!("cv" in window)) {
      throw new Error("OpenCV not found");
    }else{
      this.cv = window["cv"];
    }
  }
}
在构造函数中,添加一个名为cv的属性,以使用cv命名空间来执行相关函数。
检测文档边界
接下来,添加detect方法以返回文档的四个角点。
export interface Point {
  x: number;
  y: number;
}

export class DocumentScanner {
  detect(source:HTMLImageElement|HTMLCanvasElement):Point[]{}
}
然后,让我们分步骤实现该方法。
-
从img或canvas读取图像为OpenCV用的mat类型。
let cv = this.cv; const img = cv.imread(source); -
将图像转换为灰度。
const gray = new cv.Mat(); cv.cvtColor(img, gray, cv.COLOR_RGBA2GRAY); -
执行高斯模糊以去除噪点。
const blur = new cv.Mat(); cv.GaussianBlur(gray,blur,new cv.Size(5, 5),0,0,cv.BORDER_DEFAULT); -
执行threshold操作以获得二值化的图像。
const thresh = new cv.Mat(); cv.threshold(blur,thresh,0,255,cv.THRESH_BINARY + cv.THRESH_OTSU); -
寻找轮廓并将最大的轮廓作为候选文档。
let contours = new cv.MatVector(); let hierarchy = new cv.Mat(); cv.findContours(thresh,contours,hierarchy,cv.RETR_CCOMP, cv.CHAIN_APPROX_SIMPLE); let maxArea = 0; let maxContourIndex = -1; for (let i = 0; i < contours.size(); ++i) { let contourArea = cv.contourArea(contours.get(i)); if (contourArea > maxArea) { maxArea = contourArea; maxContourIndex = i; } } const maxContour = contours.get(maxContourIndex); -
通过计算点到中心点的距离来获得角点。将它们按顺时针方向存储在一个数组中。
const points = this.getCornerPoints(maxContour);所需的函数:
distance(p1:Point, p2:Point) { return Math.hypot(p1.x - p2.x, p1.y - p2.y); } getCornerPoints(contour:any):Point[] { let cv = this.cv; let points:Point[] = []; let rect = cv.minAreaRect(contour); const center = rect.center; let topLeftPoint; let topLeftDistance = 0; let topRightPoint; let topRightDistance = 0; let bottomLeftPoint; let bottomLeftDistance = 0; let bottomRightPoint; let bottomRightDistance = 0; for (let i = 0; i < contour.data32S.length; i += 2) { const point = { x: contour.data32S[i], y: contour.data32S[i + 1] }; const distance = this.distance(point, center); if (point.x < center.x && point.y < center.y) { if (distance > topLeftDistance) { topLeftPoint = point; topLeftDistance = distance; } } else if (point.x > center.x && point.y < center.y) { if (distance > topRightDistance) { topRightPoint = point; topRightDistance = distance; } } else if (point.x < center.x && point.y > center.y) { if (distance > bottomLeftDistance) { bottomLeftPoint = point; bottomLeftDistance = distance; } } else if (point.x > center.x && point.y > center.y) { if (distance > bottomRightDistance) { bottomRightPoint = point; bottomRightDistance = distance; } } } points.push(topLeftPoint as Point); points.push(topRightPoint as Point); points.push(bottomRightPoint as Point); points.push(bottomLeftPoint as Point); return points; } -
释放内存并返回角点。
img.delete();
gray.delete();
blur.delete();
thresh.delete();
contours.delete();
hierarchy.delete();
return points;
更正文档图像
接下来,添加一个crop方法来运行透视变换,以获得一个矫正好的图像。
crop(source:HTMLImageElement|HTMLCanvasElement,points?:Point[],width?:number,height?:number):HTMLCanvasElement{}
让我们分步骤讨论实现细节。
-
如果参数中没有预先提供角点,运行
detect以获取文档的角点。if (!points) { points = this.detect(source); } -
确定输出图像的宽度和高度。
如果用户未指定宽度和高度,则使用最长的垂直边提供高度,使用最长的水平边提供宽度。
if (!width) { width = Math.max(this.distance(points[0],points[1]),this.distance(points[2],points[3])); } if (!height) { height = Math.max(this.distance(points[0],points[3]),this.distance(points[1],points[2])); } -
创建一个转换矩阵。
let srcTri = cv.matFromArray(4, 1, cv.CV_32FC2, [ points[0].x, points[0].y, points[1].x, points[1].y, points[3].x, points[3].y, points[2].x, points[2].y, ]); let dstTri = cv.matFromArray(4, 1, cv.CV_32FC2, [ 0, 0, width, 0, 0, height, width, height, ]); let M = cv.getPerspectiveTransform(srcTri, dstTri); -
执行透视转换。
let warpedDst = new cv.Mat(); let dsize = new cv.Size(width, height); cv.warpPerspective(img,warpedDst,M,dsize,cv.INTER_LINEAR, cv.BORDER_CONSTANT, new cv.Scalar() ); -
将结果绘制到canvas元素中。
const canvas = document.createElement("canvas"); cv.imshow(canvas, warpedDst); -
释放内存并返回canvas。
img.delete()
warpedDst.delete()
return canvas;
使用文档扫描类
我们现在可以使用这个类来获取裁剪后的文档图像。
const img = document.getElementById("photo");
const documentScanner = new DocumentScanner();
const points = documentScanner.detect(img);
const canvas = documentScanner.crop(img,points);
document.getElementById("output").src = canvas.toDataURL();
例子:
基于Dynamsoft Document Viewer的文档扫描Web应用
Dynamsoft Document Viewer为文档扫描过程提供了多个组件。我们可以使用它的Capture Viewer实现带有相机控制的实时文档扫描功能,并使用它的Perspective Viewer编辑检测到的文档多边形。
实时扫描
Dynamsoft Document Viewer允许通过定义handler来集成第三方文档检测库。可以在此处找到使用Dynamsoft Document Normalizer的示例。
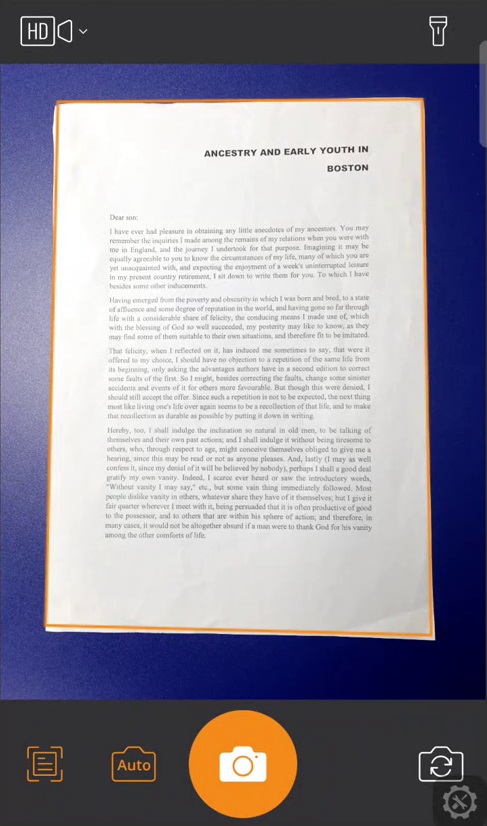
我们将编写一个handler,以便使用刚编写的OpenCV的文档检测类和Capture Viewer来扫描文档。Capture Viewer可以打开相机,绘制检测到的文档边界,并在检测结果稳定的时候自动拍照。
定义Handler
-
使用以下模板创建一个名为
dynamsoft-document-viewer-handler.ts的新文件:import { DocumentScanner } from "."; let DDV; //allows setting the DDV namespace. It is needed if Dynamsoft Document Viewer (DDV) is installed with NPM. export function setDDV(DocumentViewer:any) { DDV = DocumentViewer; } if ((window as any)["Dynamsoft"]) { const Dynamsoft = (window as any)["Dynamsoft"]; DDV = Dynamsoft.DDV; } // Inherit DocumentDetect class export class OpenCVDocumentDetectHandler extends DDV.DocumentDetect { private documentScanner:DocumentScanner; constructor(documentScanner:DocumentScanner){ super(); this.documentScanner = documentScanner; } // Rewrite the detect method async detect(image:any, detectConfig:any) {} } -
如果图像的高度大于720像素,缩小图像以提高性能。
async detect(image:any, detectConfig:any) { let width = image.width; let height = image.height; let ratio = 1; let data; const thresh = 720 if (height > thresh) { ratio = height / thresh; height = thresh; width = Math.floor(width / ratio); data = this.compress(image.data, image.width, image.height, width, height); } else { data = image.data.slice(0); } } compress( imageData:any, imageWidth:number, imageHeight:number, newWidth:number, newHeight:number, ) { let source:any = null; try { source = new Uint8ClampedArray(imageData); } catch (error) { source = new Uint8Array(imageData); } const scaleW = newWidth / imageWidth; const scaleH = newHeight / imageHeight; const targetSize = newWidth * newHeight * 4; const targetMemory = new ArrayBuffer(targetSize); let distData = null; try { distData = new Uint8ClampedArray(targetMemory, 0, targetSize); } catch (error) { distData = new Uint8Array(targetMemory, 0, targetSize); } const filter = (distCol:number, distRow:number) => { const srcCol = Math.min(imageWidth - 1, distCol / scaleW); const srcRow = Math.min(imageHeight - 1, distRow / scaleH); const intCol = Math.floor(srcCol); const intRow = Math.floor(srcRow); let distI = (distRow * newWidth) + distCol; let srcI = (intRow * imageWidth) + intCol; distI *= 4; srcI *= 4; for (let j = 0; j <= 3; j += 1) { distData[distI + j] = source[srcI + j]; } }; for (let col = 0; col < newWidth; col += 1) { for (let row = 0; row < newHeight; row += 1) { filter(col, row); } } return distData; } -
将图像数据绘制到canvas上以供OpenCV使用。
const canvas = document.createElement('canvas'); export class OpenCVDocumentDetectHandler extends DDV.DocumentDetect { private documentScanner:DocumentScanner; constructor(documentScanner:DocumentScanner){ super(); this.documentScanner = documentScanner; } // Rewrite the detect method async detect(image:any, detectConfig:any) { const quad:any[] = []; try { //... canvas.width = width; canvas.height = height; const context = canvas.getContext('2d'); if (context) { const imageData = context.createImageData(width, height); var pixelData = imageData.data; var inputArrayBuffer = data; var inputUint8Array = new Uint8Array(inputArrayBuffer); pixelData.set(inputUint8Array); context.putImageData(imageData, 0, 0); const points = this.documentScanner.detect(canvas); points.forEach(p => { quad.push([p.x * ratio, p.y * ratio]); }); } } catch (error) { console.log(error); quad.push([0, 0]); quad.push([0, 0]); quad.push([0, 0]); quad.push([0, 0]); } } } -
后处理并返回结果。使用
processDetectResult处理结果,它能检查检测到的多边形的形状是否接近文档的形状。const result:any = { location: quad, width: image.width, height: image.height, config: detectConfig, }; const ret = this.processDetectResult(result); return Promise.resolve(ret);
使用Capture Viewer捕获文档图像
-
在
index.html中,包括Dynamsoft Document Viewer的库,并为Capture Viewer添加一个容器。<script src="https://cdn.jsdelivr.net/npm/dynamsoft-document-viewer@1.0.0/dist/ddv.js"></script> <link rel="stylesheet" href="https://cdn.jsdelivr.net/npm/dynamsoft-document-viewer@1.0.0/dist/ddv.css"> <style> .fullscreen { display: none; position: fixed; top: 0; left: 0; width: 100%; height: 100%; } </style> <div id="captureViewer" class="fullscreen"></div> -
使用以下代码进行设置。可以在这里申请自己的证书。
let docManager;
let doc;
let captureViewer;
async function initDDV(){
  await Dynamsoft.DDV.setConfig({
      license: "DLS2eyJoYW5kc2hha2VDb2RlIjoiMjAwMDAxLTE2NDk4Mjk3OTI2MzUiLCJvcmdhbml6YXRpb25JRCI6IjIwMDAwMSIsInNlc3Npb25QYXNzd29yZCI6IndTcGR6Vm05WDJrcEQ5YUoifQ==", // Public trial license which is valid for 24 hours
      engineResourcePath: "https://cdn.jsdelivr.net/npm/dynamsoft-document-viewer@1.0.0/dist/engine", // Lead to a folder containing the distributed WASM files
  });
  docManager = Dynamsoft.DDV.documentManager;
  doc = docManager.createDocument({
    name: "doc"
  });
  captureViewer = new Dynamsoft.DDV.CaptureViewer({
    container: document.getElementById("captureViewer"),
    viewerConfig: {
      enableAutoCapture: true,
      enableAutoDetect: true
    }
  });
  captureViewer.openDocument(doc.uid);
}
这里还创建了一个document对象,Capture Viewer等组件会显示和操作这个对象里的图片。
-
将文档检测的Handler设置为我们刚刚创建的版本。
let documentScanner = new DocumentScanner(); const detectHandler = new OpenCVDocumentDetectHandler(documentScanner); Dynamsoft.DDV.setProcessingHandler("documentBoundariesDetect", detectHandler); -
创建一个函数来获取裁剪后的文档图像。
function getCroppedImage(points){ let canvas = documentScanner.crop(document.getElementById("photoRaw"),points); document.getElementById("output").src = canvas.toDataURL(); } -
为Capture Viewer的
captured事件添加侦听器。拍得照片时,将其加载到img元素中,并获得裁剪后的图像。captureViewer.on("captured", async (e) => { // Stop video stream and hide capture viewer's container captureViewer.stop(); document.getElementById("captureViewer").style.display = "none"; const pageData = await captureViewer.currentDocument.getPageData(e.pageUid); // Original image let url = URL.createObjectURL(pageData.raw.data); await loadImage(document.getElementById("photoRaw"), url); getCroppedImage(); captureViewer.currentDocument.deleteAllPages(); }); async function loadImage(img,src) { return new Promise((resolve, reject) => { img.onload = function(){ resolve(); } img.src = src; }) } -
Live Scan按钮被点击时启动Capture Viewer。document.getElementById("liveScanBtn").addEventListener("click",function(){ if (captureViewer) { document.getElementById("captureViewer").style.display = "block"; captureViewer.play({fill:true}); //pass fill to make set the object-fit style of the video to cover } })
我们可以看到,我们定义的Handler可以和Capture Viewer一起工作了。
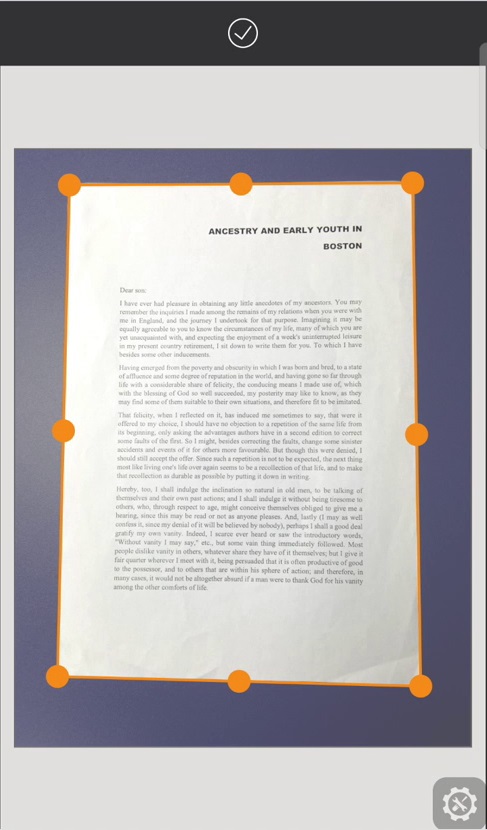
多边形编辑
有时我们可能需要对检测到的文档的多边形进行微调。我们可以使用Perspective Viewer来完成此操作。
-
为Perspective Viewer添加一个容器。
<div id="perspectiveViewer" class="fullscreen"></div> -
使用以下代码进行设置。
let perspectiveViewer = new Dynamsoft.DDV.PerspectiveViewer({ container: document.getElementById("perspectiveViewer"), uiConfig: isMobile()? mobilePerspectiveUiConfig : pcPerspectiveUiConfig }); perspectiveViewer.openDocument(doc.uid);它的UI(如工具栏上的按钮)可以使用UIConfig进行自定义。在这里,我们只保留
perspectiveAll按钮作为确认按钮。function isMobile(){ return "ontouchstart" in document.documentElement; } const mobilePerspectiveUiConfig = { type: Dynamsoft.DDV.Elements.Layout, flexDirection: "column", children: [ { type: Dynamsoft.DDV.Elements.Layout, className: "ddv-perspective-viewer-header-mobile", children: [ { // Bind event for "PerspectiveAll" button // The event will be registered later. type: Dynamsoft.DDV.Elements.PerspectiveAll, events:{ click: "done" } }, ], }, Dynamsoft.DDV.Elements.MainView ], }; //Pc PerspectiveViewer const pcPerspectiveUiConfig = { type: Dynamsoft.DDV.Elements.Layout, flexDirection: "column", children: [ { type: Dynamsoft.DDV.Elements.Layout, className: "ddv-perspective-viewer-header-desktop", children: [ { // Bind event for "PerspectiveAll" button // The event will be registered later. type: Dynamsoft.DDV.Elements.PerspectiveAll, className: "ddv-perspective-viewer-perspective-desktop", events:{ click: "done" } }, ], }, Dynamsoft.DDV.Elements.MainView, ], }; -
为Perspective Viewer的
done事件添加侦听器。编辑完成后,使用调整过后的多边形的角点来获得裁剪的图像。perspectiveViewer.on("done", async () => { const quad = perspectiveViewer.getQuadSelection(); const points = []; quad.forEach(p => { points.push({x:p[0],y:p[1]}) }); getCroppedImage(points); document.getElementById("perspectiveViewer").style.display = "none"; perspectiveViewer.currentDocument.deleteAllPages(); }); -
修改Capture Viewer的
captured事件的侦听器,以使用Perspective Viewer编辑多边形。+let points = documentScanner.detect(document.getElementById("photoRaw")); +await loadImageToDoc(document.getElementById("photoRaw").src); +showPerspectiveViewer(points); -getCroppedImage(); captureViewer.currentDocument.deleteAllPages();添加的函数:
//load an image to the document and it will be displayed in the viewers
async function loadImageToDoc(dataURL) {
  const response = await fetch(dataURL);
  const blob = await response.blob();
  await doc.loadSource(blob);
}

function showPerspectiveViewer(points){
  document.getElementById("perspectiveViewer").style.display = "block";
  const quad = [];
  points.forEach(point => {
    quad.push([point.x,point.y]);
  });
  perspectiveViewer.setQuadSelection(quad);
}
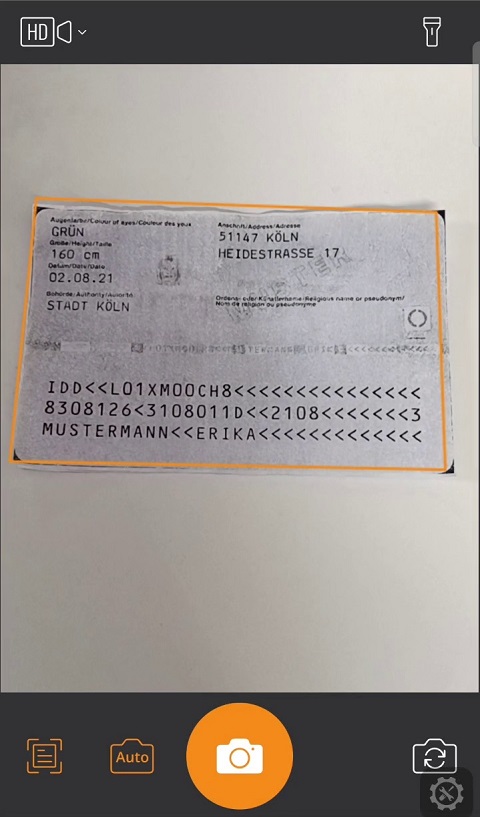
屏幕截图:
打包为库
为了便于使用,我们可以将其作为库发布到NPM上。
-
安装
devDependencies:npm install -D @types/node vite-plugin-dts -
创建一个新的
vite.config.ts文件:// vite.config.ts import { resolve } from 'path'; import { defineConfig } from 'vite'; import dts from 'vite-plugin-dts'; // https://vitejs.dev/guide/build.html#library-mode export default defineConfig({ build: { lib: { entry: resolve(__dirname, 'src/index.ts'), name: 'opencv-document-scanner', fileName: 'opencv-document-scanner', }, }, plugins: [dts()], }); -
将我们的包的入口点添加到
package.json。{ "main": "./dist/opencv-document-scanner.umd.cjs", "module": "./dist/opencv-document-scanner.js", "types": "./dist/index.d.ts", "exports": { "import": { "types": "./dist/index.d.ts", "default": "./dist/opencv-document-scanner.js" }, "require": { "types": "./dist/index.d.ts", "default": "./dist/opencv-document-scanner.umd.cjs" } }, "files": [ "dist/*.css", "dist/*.js", "dist/*.cjs", "dist/*.d.ts" ] }
运行npm run build。然后,我们可以在dist文件夹中看到打包好的文件。
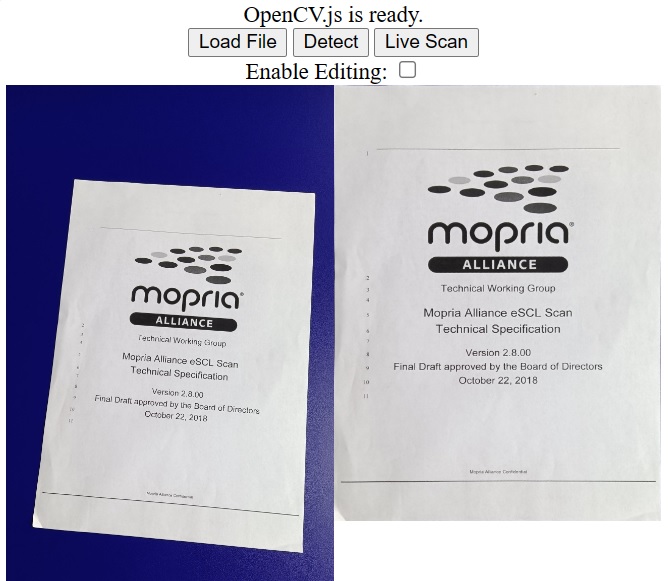
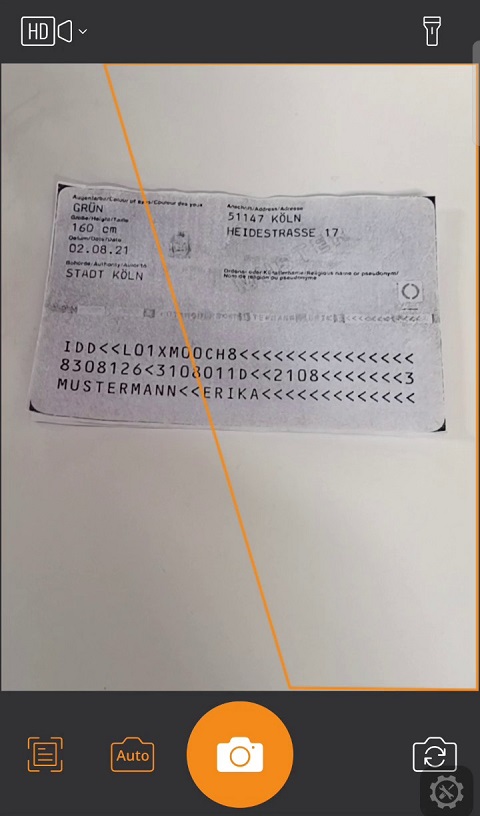
局限
该算法比较基础。在深色背景下扫描白色文档的效果很好。但背景复杂的话效果就不行了。对于更复杂的情况,我们可以使用Dynamsoft Document Normalizer来获得更好的结果。
使用OpenCV进行扫描测试(demo链接):
使用Dynamsoft Document Normalizer进行扫描测试(demo链接):
源代码
欢迎下载源代码并尝试使用: