
在上一篇文章中,我们编写了一个JavaFX的演示程序,使用Dynamsoft Service的REST API扫描文档。该演示程序可以通过TWAIN、WIA、SANE和ICA等协议用文档扫描仪扫描文档,并使用PDFBox将文档保存到PDF文件中。
在本文中,我们将扩展它的功能,让它能将扫描的文档转换为可搜索的PDF。
打开可搜索的PDF时,我们可以直接选择文本和搜索关键字。生成可搜索的PDF对于文档索引或管理系统非常有用。
如果PDF是用InDesign和Word等工具生成的,那么它的文本已经可以搜索了。但是,如果PDF包含扫描的图像,我们需要添加额外的文本覆盖层,使其可搜索。
扫描文档的OCR
我们首先需要用OCR得到扫描图像中的文字和其位置信息。有各种OCR引擎或API服务可以调用。这里,我们使用OCRSpace的免费OCR API。
-
创建相关定义。
TextLine.class:public class TextLine { public double left; public double top; public double width; public double height; public String text; public TextLine(double left, double top, double width, double height, String text) { this.left = left; this.top = top; this.width = width; this.height = height; this.text = text; } }OCRResult.class:public class OCRResult { public ArrayList<TextLine> lines = new ArrayList<TextLine>(); } -
创建一个
OCRSpace类,该类提供从base64编码图像获取OCR结果的静态方法。public class OCRSpace { public static String key = ""; public static String lang = "eng"; /** * Get OCR result from a base64-encoded image in JPEG format * * @param base64 - base64-encoded image * */ public static OCRResult detect(String base64) throws IOException { OCRResult result = new OCRResult(); OkHttpClient client = new OkHttpClient.Builder() .connectTimeout(120, TimeUnit.SECONDS) .build(); RequestBody requestBody=new FormBody.Builder() .add("apikey",key) .add("language",lang) .add("base64Image","data:image/jpeg;base64,"+base64.trim()) .add("isOverlayRequired","true") .build(); Request httpRequest = new Request.Builder() .url("https://api.ocr.space/parse/image") .post(requestBody) .build(); try (Response response = client.newCall(httpRequest).execute()) { try { String json = response.body().string(); parse(json,result); } catch (IOException e) { throw new RuntimeException(e); } } return result; } private static void parse(String json,OCRResult ocrResult) throws JsonProcessingException { ObjectMapper objectMapper = new ObjectMapper(); Map<String,Object> body = objectMapper.readValue(json,new TypeReference<Map<String,Object>>() {}); List<Map<String,Object>> parsedResults = (List<Map<String, Object>>) body.get("ParsedResults"); for (Map<String,Object> parsedResult:parsedResults) { Map<String,Object> textOverlay = (Map<String, Object>) parsedResult.get("TextOverlay"); List<Map<String,Object>> lines = (List<Map<String, Object>>) textOverlay.get("Lines"); for (Map<String,Object> line:lines) { TextLine textLine = parseAsTextLine(line); ocrResult.lines.add(textLine); } } } private static TextLine parseAsTextLine(Map<String,Object> line){ String lineText = (String) line.get("LineText"); List<Map<String,Object>> words = (List<Map<String, Object>>) line.get("Words"); int minX = (int)((double) words.get(0).get("Left")); int minY = (int)((double) words.get(0).get("Top")); int maxX = 0; int maxY = 0; for (Map<String,Object> word:words) { int x = (int)((double) word.get("Left")); int y = (int)((double) word.get("Top")); int width = (int)((double) word.get("Width")); int height = (int)((double) word.get("Height")); minX = Math.min(minX,x); minY = Math.min(minY,y); maxX = Math.max(maxX,x+width); maxY = Math.max(maxY,y+height); } return new TextLine(minX,minY,maxX - minX,maxY-minY,lineText); } }使用OKHttp用于HTTP请求,Jackson用于处理JSON。
将文本覆盖层添加到PDF页面中
-
创建
SearchablePDFCreator类以提供相关方法。public class SearchablePDFCreator {} -
添加
addTextOverlay方法,将文本覆盖层添加到现有的PDF页面。/** * Add text overlay to an existing PDF page * @param contentStream - PDF content stream * @param result - OCR result * @param pageHeight - Height of the image * @param pdFont - Specify a font for evaluation of the position * @param percent - image's height / page's height */ public static void addTextOverlay(PDPageContentStream contentStream,OCRResult result, double pageHeight, PDFont pdFont,double percent) throws IOException { PDFont font = pdFont; contentStream.setFont(font, 16); contentStream.setRenderingMode(RenderingMode.NEITHER); for (int i = 0; i <result.lines.size() ; i++) { TextLine line = result.lines.get(i); FontInfo fi = calculateFontSize(font,line.text, (float) (line.width * percent), (float) (line.height * percent)); contentStream.beginText(); contentStream.setFont(font, fi.fontSize); contentStream.newLineAtOffset((float) (line.left * percent), (float) ((pageHeight - line.top - line.height) * percent)); contentStream.showText(line.text); contentStream.endText(); } } private static FontInfo calculateFontSize(PDFont font, String text, float bbWidth, float bbHeight) throws IOException { int fontSize = 17; float textWidth = font.getStringWidth(text) / 1000 * fontSize; float textHeight = font.getFontDescriptor().getFontBoundingBox().getHeight() / 1000 * fontSize; if(textWidth > bbWidth){ while(textWidth > bbWidth){ fontSize -= 1; textWidth = font.getStringWidth(text) / 1000 * fontSize; textHeight = font.getFontDescriptor().getFontBoundingBox().getHeight() / 1000 * fontSize; } } else if(textWidth < bbWidth){ while(textWidth < bbWidth){ fontSize += 1; textWidth = font.getStringWidth(text) / 1000 * fontSize; textHeight = font.getFontDescriptor().getFontBoundingBox().getHeight() / 1000 * fontSize; } } FontInfo fi = new FontInfo(); fi.fontSize = fontSize; fi.textHeight = textHeight; fi.textWidth = textWidth; return fi; }字体大小是根据指定的字体和文字行宽度自动计算的。
-
添加
addPage方法,可以将文本覆盖层与图像一起添加为文档的新页面。public static void addPage(byte[] imageBytes,OCRResult result, PDDocument document,int pageIndex,PDFont pdFont) throws IOException { ByteArrayInputStream in = new ByteArrayInputStream(imageBytes); BufferedImage bi = ImageIO.read(in); // Create a new PDF page PDRectangle rect = new PDRectangle((float) bi.getWidth(),(float) bi.getHeight()); PDPage page = new PDPage(rect); document.addPage(page); PDPageContentStream contentStream = new PDPageContentStream(document, page); PDImageXObject image = PDImageXObject.createFromByteArray(document,imageBytes,String.valueOf(pageIndex)); contentStream.drawImage(image, 0, 0); addTextOverlay(contentStream,result,bi.getHeight(),pdFont); contentStream.close(); }
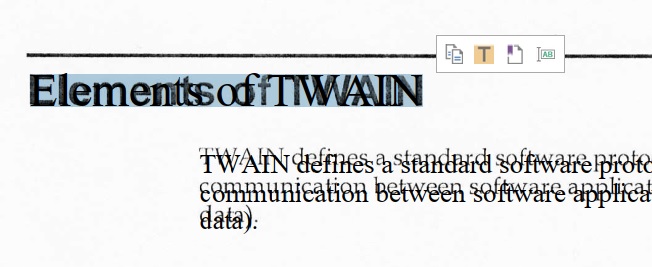
让我们检查一下添加结果。
使用RenderingMode.NEITHER将使文本图层不可见。我们可以把这一行注释掉,以看到添加上去的文字。以下是覆盖了文本的PDF文件的一个区域。我们可以看到文本与图像基本吻合。
将扫描的文档图像保存为可搜索的PDF
接下来,我们可以尝试使用我们刚刚编写的类从图像文件创建一个可搜索的PDF。
File image = new File("F://WebTWAINImage.jpg");
byte[] byteArray = new byte[(int) image.length()];
try (FileInputStream inputStream = new FileInputStream(image)) {
    inputStream.read(byteArray);
} catch (IOException e) {
    throw new RuntimeException(e);
}
String base64 = Base64.getEncoder().encodeToString(byteArray);
OCRSpace.key = "your key";
OCRResult result = OCRSpace.detect(base64);
PDDocument document = new PDDocument();
SearchablePDFCreator.addPage(byteArray,result,document,0);
document.save(new File("F://output.pdf"));
document.close();
使用Searchable PDF Creator加强JavaFX演示程序
-
编辑
pom.xml,将库添加为依赖项。<repositories> <repository> <id>jitpack.io</id> <url>https://jitpack.io</url> </repository> </repositories> <dependencies> <dependency> <groupId>com.github.tony-xlh</groupId> <artifactId>searchablePDF4j</artifactId> <version>1.0.0</version> </dependency> </dependencies> - 添加复选框以在UI中启用可搜索PDF的生成。
-
如果选中该复选框,则通过添加文本覆盖层来生成可搜索的PDF。
 PDDocument document = new PDDocument();
 int index = 0;
 for (DocumentImage di: documentListView.getItems()) {
     index = index + 1;
     ImageView imageView = di.imageView;
     PDRectangle rect = new PDRectangle((float) imageView.getImage().getWidth(),(float) imageView.getImage().getHeight());
     System.out.println(rect);
     PDPage page = new PDPage(rect);
     document.addPage(page);
     PDPageContentStream contentStream = new PDPageContentStream(document, page);
     PDImageXObject image
             = PDImageXObject.createFromByteArray(document,di.image,String.valueOf(index));
     contentStream.drawImage(image, 0, 0);
+    if (searchablePDFCheckBox.isSelected()) {
+        String base64 = Base64.getEncoder().encodeToString(di.image);
+        OCRSpace.key = "your key";
+        OCRResult result = OCRSpace.detect(base64);
+        SearchablePDFCreator.addTextOverlay(contentStream,result,image.getHeight());
+    }
     contentStream.close();
 }
 document.save(fileToSave.getAbsolutePath());
 document.close();
源代码
获取源代码来自己试用一下吧: