
黑白二值图像的像素只有黑色和白色两种颜色。将图像转换为黑白有多种用途:
- 减少文件大小:与24位彩色图像相比,1位黑白图像所需的存储数据通常更少。
- 图像处理:许多图像处理算法需要先将图像转换为二值图。
- 用于显示和打印:一些输入/输出设备,如激光打印机、传真机和显示器,只能处理二值图。
- 美学:二值图像的像素明显,可以算作一种像素艺术。
将图像转换为黑白的过程称为阈值处理(thresholding),通常执行以下操作:
- 将图像转换为灰度
- 如果像素的灰度值小于阈值,则将该像素替换为黑色;如果大于阈值,则将该像素替换为白色
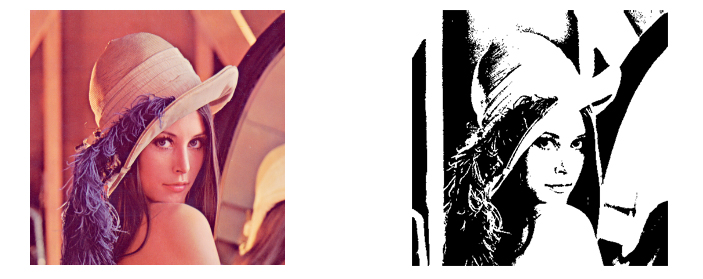
转换为黑白的示例图像:
在本文中,我们将讨论使用JavaScript将图像转换为黑白二值图的两种方法。
- Canvas
- Dynamic Web TWAIN ,一个文档扫描SDK
编写一个HTML5页面以转换图像为黑白
使用以下模板创建一个新的HTML5页面,然后让我们为其添加图像颜色转换功能。
<!DOCTYPE html>
<html lang="en">
<head>
  <meta charset="UTF-8">
  <meta name="viewport" content="width=device-width, initial-scale=1.0">
  <title>Convert an Image to Black and White</title>
  <style>
  </style>
</head>
<body>
  <div class="home">
    <h2>Convert an Image to Black and White</h2>
    <button id="convertButton">Convert</button>
  </div>
  <script>
  </script>
</body>
</html>
加载图片
添加用于选择文件的input元素,并使用按钮触发它。图片将被加载到两个img元素中,一个用于显示转换的结果,另一个用于存储原始图像。
HTML:
<button id="loadFileButton">Load a File</button>
<input style="display:none;" type="file" id="file" onchange="loadImageFromFile();" accept=".jpg,.jpeg,.png,.bmp" />
<div class="imageContainer">
  <img id="image"/>
  <img id="imageHidden"/>
</div>
<style>
  .imageContainer {
    max-width: 50%;
  }

  #image {
    max-width: 100%;
  }

  #imageHidden {
    display: none;
  }
</style>
JavaScript:
function loadImageFromFile(){
  let fileInput = document.getElementById("file");
  let files = fileInput.files;
  if (files.length == 0) {
    return;
  }
  let file = files[0];
  fileReader = new FileReader();
  fileReader.onload = function(e){
    document.getElementById("image").src = e.target.result;
    document.getElementById("imageHidden").src = e.target.result;
  };
  fileReader.onerror = function () {
    console.warn('oops, something went wrong.');
  };
  fileReader.readAsDataURL(file);
}
使用Canvas将图像转换为黑白
HTML5提供了一个canvas标签,我们可以用它操作图像数据。我们可以使用它将图像转换为黑白。
-
向页面添加一个隐藏的
canvas元素。<canvas id="canvasHidden"></canvas> <style> #canvasHidden { display: none; } </style> -
添加用于指定旋转阈值的
input元素。<div class="thresholdControls" style="display:inline"> <label> Threshold (0-255): <input id="threshold" type="number" min="0" max="255" value="127"> </label> </div> -
将canvas的大小设置为图像的大小。
const image = document.getElementById("image"); const canvas = document.getElementById("canvasHidden"); canvas.width = image.naturalWidth; canvas.height = image.naturalHeight; -
获取canvas的context以执行操作。
const context = canvas.getContext("2d"); -
将图像绘制到canvas上。
context.drawImage(image, 0, 0); -
获取图像的
ImageData:const imageData = context.getImageData(0, 0, canvas.width, canvas.height);ImageData以RGBA顺序将像素值存储在Uint8ClampedArray中,取值范围是0到255。像素从左上角到右下角逐行排列。 -
创建一个函数以根据RGB值计算灰度值。
 //https://github.com/image-js/image-js/blob/9ab86a86f6c13a9a7d14c62566c1396c3c6f54f4/src/image/transform/greyAlgorithms.js
 function RGBToGrayScale(red,green,blue){
   //return red * 0.2126 + green * 0.7152 + blue * 0.0722;
   return (red * 6966 + green * 23436 + blue * 2366) >> 15;
 }
计算灰度值的方法有很多。这里,我们使用
Rec. 709亮度系数进行转换。使用基于整数的乘法计算和移位优化了计算速度。 -
创建一个函数以根据阈值确定像素值应该为黑色还是白色。
//return true if the value should be black. return false if the value should be white function threshold(grayscale){ const thresholdValue = parseInt(document.getElementById("threshold").value); if (grayscale < thresholdValue) { return true; }else{ return false; } } -
遍历所有像素,将RGB值设置为我们计算出的黑白值,黑色是0,白色是255。
const pixels = imageData.data; //[r,g,b,a,...] for (var i = 0; i < pixels.length; i += 4) { const red = pixels[i]; const green = pixels[i + 1]; const blue = pixels[i + 2]; const grayscale = RGBToGrayScale(red, green, blue) if (threshold(grayscale)) { pixels[i] = 0; pixels[i + 1] = 0; pixels[i + 2] = 0; }else{ pixels[i] = 255; pixels[i + 1] = 255; pixels[i + 2] = 255; } } -
放回
ImageData。context.putImageData(imageData, 0, 0); -
显示转换后的图像。
image.src = canvas.toDataURL();
使用OTSU方法确定阈值
我们可以使用OTSU方法自动确定分离背景和前景的最佳阈值。
-
在页面中包含以下JS文件。
//https://github.com/cawfree/otsu/ const histo = (data, bins) => data.reduce((arr, e) => { arr[bins.indexOf(e)] += 1; return arr; }, [...Array(bins.length)].fill(0)); const width = (hist, s, e) => { let v = 0; for (let i = s; i < e; i += 1) { v += hist[i]; } return v; }; const bins = data => Array.from(new Set(data)).sort((e0, e1) => e0 - e1); const weight = (hist, s, e, total) => { let v = 0; for (let i = s; i < e; i += 1) { v += hist[i]; } return v / total; }; const mean = (hist, bins, s, e, width) => { let v = 0; for (let i = s; i < e; i += 1) { v += hist[i] * bins[i]; } return v * width; }; const variance = (hist, bins, s, e, mean, width) => { let v = 0; for (let i = s; i < e; i += 1) { const d = bins[i] - mean; v += d * d * hist[i]; } return v * width; }; const cross = (wb, vb, wf, vf) => wb * vb + wf * vf; const otsu = (data) => { const b = bins(data); const h = histo(data, b); const { length: total } = data; const vars = [...Array(b.length)].map((_, i) => { const s0 = 0; const e0 = i; const s1 = i; const e1 = h.length; const w0 = 1 / width(h, s0, e0); const w1 = 1 / width(h, s1, e1); const wb = weight(h, s0, e0, total); const vb = variance(h, b, s0, e0, mean(h, b, s0, e0, w0), w0); const wf = weight(h, s1, e1, total); const vf = variance(h, b, s1, e1, mean(h, b, s1, e1, w1), w1); const x = cross(wb, vb, wf, vf); return !isNaN(x) ? x : Number.POSITIVE_INFINITY; }); return b[vars.indexOf(Math.min(...vars))]; }; -
使用OTSU计算阈值。我们需要将灰度直方图传递给
otsu函数。function calculateThresholdWithOTSU(){ const image = document.getElementById("imageHidden"); const canvas = document.getElementById("canvasHidden"); const width = image.naturalWidth; const height = image.naturalHeight; const context = canvas.getContext('2d'); canvas.width = width; canvas.height = height; context.drawImage(image, 0, 0); const imageData = context.getImageData(0, 0, canvas.width, canvas.height); const pixels = imageData.data; //[r,g,b,a,...] const grayscaleValues = []; for (var i = 0; i < pixels.length; i += 4) { const red = pixels[i]; const green = pixels[i + 1]; const blue = pixels[i + 2]; const grayscale = RGBToGrayScale(red, green, blue) grayscaleValues.push(grayscale); } document.getElementById("threshold").value = otsu(grayscaleValues); }
使用Dynamic Web TWAIN将图像转换为黑白
Dynamic Web TWAIN是一个文档扫描SDK,可以在浏览器中扫描文档。它提供了各种图像处理方法。我们可以使用其ConvertToBW方法转换图像为黑白。
使用它的优点是,它可以用于批量处理大量图像,因为处理是使用本地进程完成的。由于使用了libpng等本地图像库根据颜色信息输出文件,输出文件的尺寸也会更优。
以下是使用它的步骤:
-
在页面中引入Dynamic Web TWAIN。
<script src="https://unpkg.com/dwt@18.4.2/dist/dynamsoft.webtwain.min.js"></script> -
初始化一个Web TWAIN的实例并使用它来转换图像。可以在此处申请其许可证。
let DWObject;
Dynamsoft.DWT.AutoLoad = false;
Dynamsoft.DWT.ProductKey = "DLS2eyJoYW5kc2hha2VDb2RlIjoiMjAwMDAxLTE2NDk4Mjk3OTI2MzUiLCJvcmdhbml6YXRpb25JRCI6IjIwMDAwMSIsInNlc3Npb25QYXNzd29yZCI6IndTcGR6Vm05WDJrcEQ5YUoifQ=="; //one-day trial
Dynamsoft.DWT.ResourcesPath = "https://unpkg.com/dwt@18.4.2/dist";

async function convertWithDWT(){
  if (!DWObject) {
    await initDWT();
  }
  DWObject.RemoveAllImages();
  let response = await fetch(document.getElementById("imageHidden").src);
  let buffer = await response.arrayBuffer();
  DWObject.LoadImageFromBinary(buffer,
  function(){
    const convert = async () => {
      const thresholdValue = parseInt(document.getElementById("threshold").value);
      await DWObject.RunCommandAsync({command:"convertToBW",parameter:{index:0,threshold:thresholdValue}});
      document.getElementById("image").src = DWObject.GetImageURL(0);
    }
    convert();
  },
  function(errorCode, errorString){
    console.log(errorString);
  })
}

function initDWT(){
  return new Promise((resolve, reject) => {
    const title = document.querySelector("h2").innerText;
    document.querySelector("h2").innerText = "Loading Dynamic Web TWAIN...";
    Dynamsoft.DWT.CreateDWTObjectEx(
    {
      WebTwainId: 'dwtcontrol'
    },
    function(obj) {
      DWObject = obj;
      document.querySelector("h2").innerText = title;
      resolve();
    },
    function(err) {
      console.log(err);
      document.querySelector("h2").innerText = "Failed to load Dynamic Web TWAIN";
      reject(err);
    }
  );
  })
}
源代码
可以在以下仓库中找到所有代码和在线演示: