
有时,我们可能需要将多个图像合并到单个PDF文件中。例如,扫描身份证的正面和背面,并将它们存储在一个PDF文件中。
在本文中,我们将讨论如何使用Java编写一个安卓应用,利用Dynamsoft Document Normalizer将图像合并到PDF文件中。
新建项目
打开Android Studio并创建一个新的Empty Views Activity。
添加依赖项
接下来,添加Dynamsoft Document Normalizer及其依赖项。
-
将以下内容添加到
settings.gradle。dependencyResolutionManagement { repositoriesMode.set(RepositoriesMode.FAIL_ON_PROJECT_REPOS) repositories { maven { url "https://download2.dynamsoft.com/maven/aar" } } } -
将以下内容添加到
build.gradle。implementation 'com.dynamsoft:dynamsoftcapturevisionrouter:2.2.30' implementation 'com.dynamsoft:dynamsoftcore:3.2.30' implementation 'com.dynamsoft:dynamsoftdocumentnormalizer:2.2.11' implementation 'com.dynamsoft:dynamsoftimageprocessing:2.2.30' implementation 'com.dynamsoft:dynamsoftlicense:3.2.20' implementation 'com.dynamsoft:dynamsoftutility:1.2.20'
布局设计
打开activity_main.xml并添加以下内容:
<Button
    android:id="@+id/selectImagesButton"
    android:layout_width="wrap_content"
    android:layout_height="wrap_content"
    android:text="Select Images for Merging into PDF"
    app:layout_constraintBottom_toBottomOf="parent"
    app:layout_constraintEnd_toEndOf="parent"
    app:layout_constraintStart_toStartOf="parent"
    app:layout_constraintTop_toTopOf="parent" />

<CheckBox
    android:id="@+id/enableAutoCroppingCheckBox"
    android:layout_width="wrap_content"
    android:layout_height="wrap_content"
    android:text="Enable Auto Cropping"
    app:layout_constraintEnd_toEndOf="parent"
    app:layout_constraintStart_toStartOf="parent"
    app:layout_constraintTop_toBottomOf="@+id/selectImagesButton" />

<RadioGroup
    android:id="@+id/radioGroup"
    android:layout_width="wrap_content"
    android:layout_height="wrap_content"
    android:layout_marginStart="151dp"
    android:layout_marginEnd="148dp"
    app:layout_constraintEnd_toEndOf="parent"
    app:layout_constraintStart_toStartOf="parent"
    app:layout_constraintTop_toBottomOf="@+id/enableAutoCroppingCheckBox">

    <RadioButton
        android:id="@+id/blackAndWhiteRadioButton"
        android:layout_width="match_parent"
        android:layout_height="wrap_content"
        android:text="Black and White" />

    <RadioButton
        android:id="@+id/grayRadioButton"
        android:layout_width="match_parent"
        android:layout_height="wrap_content"
        android:text="Grayscale" />

    <RadioButton
        android:id="@+id/colorRadioButton"
        android:layout_width="match_parent"
        android:layout_height="wrap_content"
        android:checked="true"
        android:text="Color" />
</RadioGroup>
<TextView
    android:id="@+id/textView"
    android:layout_width="wrap_content"
    android:layout_height="wrap_content"
    android:layout_marginTop="15dp"
    android:textAlignment="center"
    app:layout_constraintEnd_toEndOf="parent"
    app:layout_constraintStart_toStartOf="parent"
    app:layout_constraintTop_toBottomOf="@+id/radioGroup" />
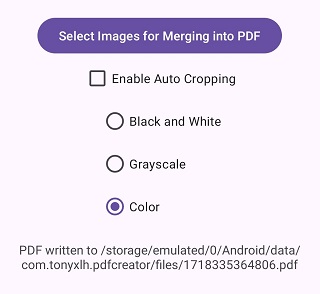
布局如下面的屏幕截图所示。它包含一个用于从图库中选择图像的按钮,一个用于启用自动裁剪文档的复选框,以及用于选择颜色模式的单选按钮。
从图库中选择图像
创建一个新的ActivityResultLauncher。在selectImagesButton的点击事件中,启动它来选择图片。我们可以在onActivityResult中获取URI列表。
public class MainActivity extends AppCompatActivity {
    public static final String TAG = "DDN";
    private ActivityResultLauncher<String[]> galleryActivityLauncher;
    @Override
    protected void onCreate(Bundle savedInstanceState) {
        Button selectImagesButton = findViewById(R.id.selectImagesButton);
        selectImagesButton.setOnClickListener((view)->{
            galleryActivityLauncher.launch(new String[]{"image/*"});
        });
        galleryActivityLauncher = registerForActivityResult(new ActivityResultContracts.OpenMultipleDocuments(), new ActivityResultCallback<List<Uri>>() {
            @Override
            public void onActivityResult(List<Uri> results) {
                if (results != null) {
                    // perform desired operations using the result Uri
                    Log.d(TAG,"selected "+results.size()+" files");
                    textView.setText("Merging...");
                    new Thread(new Runnable() {
                        @Override
                        public void run() {
                            try {
                                mergeImagesToPDF(results);
                            } catch (Exception e) {
                                throw new RuntimeException(e);
                            }
                        }
                    }).start();
                } else {
                    Log.d(TAG, "onActivityResult: the result is null for some reason");
                }
            }
        });
    }
}
使用Dynamsoft Document Normalizer将图像合并为PDF
-
初始化Dynamsoft Document Normalizer的许可证。可以此处申请许可证。
private static final String LICENSE = "DLS2eyJoYW5kc2hha2VDb2RlIjoiMjAwMDAxLTE2NDk4Mjk3OTI2MzUiLCJvcmdhbml6YXRpb25JRCI6IjIwMDAwMSIsInNlc3Npb25QYXNzd29yZCI6IndTcGR6Vm05WDJrcEQ5YUoifQ=="; protected void onCreate(Bundle savedInstanceState) { LicenseManager.initLicense(LICENSE, this, (isSuccess, error) -> { if (!isSuccess) { Log.e(TAG, "InitLicense Error: " + error); } }); } -
创建Capture Vision Router的实例以调用Dynamsoft Document Normalizer。
private CaptureVisionRouter mRouter; protected void onCreate(Bundle savedInstanceState) { mRouter = new CaptureVisionRouter(MainActivity.this); } -
处理图像并将其保存为PDF文件。它使用Capture Vision Router处理图像,并使用Image Manager保存结果为PDF文件。
private void mergeImagesToPDF(List<Uri> results) throws Exception { String templateName = EnumPresetTemplate.PT_NORMALIZE_DOCUMENT; if (enableAutoCroppingCheckBox) { templateName = EnumPresetTemplate.PT_DETECT_AND_NORMALIZE_DOCUMENT; }else{ templateName = EnumPresetTemplate.PT_NORMALIZE_DOCUMENT; SimplifiedCaptureVisionSettings settings = mRouter.getSimplifiedSettings(EnumPresetTemplate.PT_NORMALIZE_DOCUMENT); settings.roiMeasuredInPercentage = true; settings.roi = new Quadrilateral(new Point(0,0),new Point(100,0),new Point(100,100),new Point(0,100)); //process full image mRouter.updateSettings(EnumPresetTemplate.PT_NORMALIZE_DOCUMENT,settings } ImageManager imageManager = new ImageManager(); File externalFilesDir = this.getApplicationContext().getExternalFilesDir(""); String filename = new Date().getTime()+".pdf"; File outputFile = new File(externalFilesDir,filename); for (Uri result:results) { InputStream inp = this.getApplicationContext().getContentResolver().openInputStream(result); if (inp != null) { ByteArrayOutputStream buffer = new ByteArrayOutputStream(); int nRead; byte[] data = new byte[16384]; while ((nRead = inp.read(data, 0, data.length)) != -1) { buffer.write(data, 0, nRead); } CapturedResult capturedResult = mRouter.capture(buffer.toByteArray(), templateName); NormalizedImagesResult normalizedImagesResult = capturedResult.getNormalizedImagesResult(); if (normalizedImagesResult != null) { NormalizedImageResultItem[] items = normalizedImagesResult.getItems(); if (items != null && items.length>0) { ImageData imageData = items[0].getImageData(); imageManager.saveToFile(imageData,outputFile.getPath(),true); //will append images to a PDF file } } } } Log.d(TAG,"run on ui thread"); runOnUiThread(()->{ if (outputFile.exists()) { textView.setText("PDF written to "+outputFile.getAbsolutePath()); }else{ textView.setText("Failed"); } }); } -
使用以下代码修改颜色模式。将图像转换为黑白可以清理背景并减少文件的大小。转换为灰度的话,能在文件大小和图像细节上取得一个平衡。
private void updateColorMode() throws CaptureVisionRouterException {
    int colorMode;
    if (blackAndWhiteRadioButton.isChecked()){
        colorMode = EnumImageColourMode.ICM_BINARY;
    }else if (grayRadioButton.isChecked()){
        colorMode = EnumImageColourMode.ICM_GRAYSCALE;
    }else{
        colorMode = EnumImageColourMode.ICM_COLOUR;
    }
    SimplifiedCaptureVisionSettings settings = mRouter.getSimplifiedSettings(templateName);
    settings.documentSettings.colourMode = mode;
    mRouter.updateSettings(templateName,settings);
}
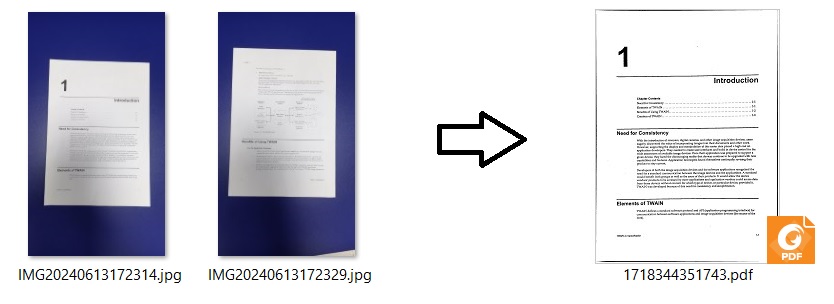
已转换文件的截图:
源代码
查看源代码进行试用:https://github.com/tony-xlh/Merge-Images-to-PDF/tree/main/Android/PDFCreator