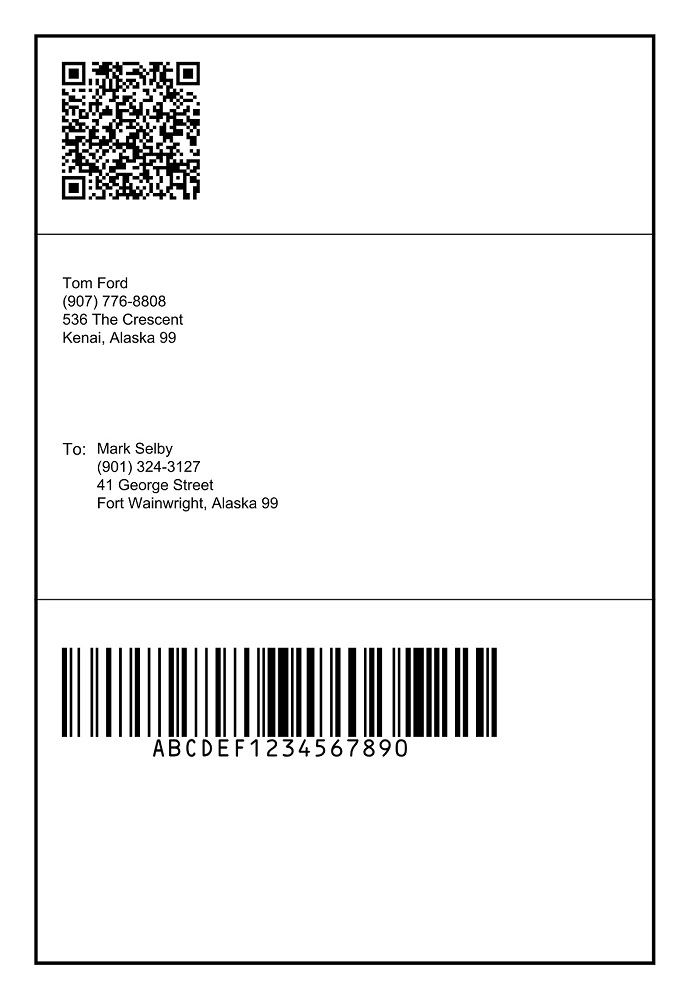
快递包装上一般都贴着快递单,通常包含以下信息:
- 发件人和收件人的详细信息(姓名、电话号码、地址)
- 快递单号
- 用于使用机器读取信息的条码
国际上快递单的尺寸一般是为4x6英寸(10x15厘米)。
快递单示例:

在本文中,我们将编写一个在线快递单PDF生成器。可以在任何具有浏览器功能的设备上执行此操作。
我们将使用两个库:
- Dynamsoft Document Viewer:绘制文本和图形并输出PDF文件。需要许可证才能使用它。可以在这里申请一个证书。
- bwip-js:用于生成条码。
新建HTML文件
创建一个包含以下模板的新HTML文件。
<!DOCTYPE html>
<html lang="en">
<head>
  <meta charset="UTF-8">
  <meta name="viewport" content="width=device-width, initial-scale=1.0">
  <title>Online Shipping Label Generator</title>
  <style>
  h2 {
    text-align: center;
  }

  #app {
    display: flex;
    flex-direction: column;
    align-items: center;
  }
  </style>
</head>
<body>
  <div id="app">
    <h2>Online Shipping Label Generator</h2>
  </div>
  <script></script>
</body>
</html>
添加依赖项
在head中包含第三方库:
<script type="text/javascript" src="https://cdn.jsdelivr.net/npm/bwip-js/dist/bwip-js-min.js"></script>
<script src="https://cdn.jsdelivr.net/npm/dynamsoft-document-viewer@latest/dist/ddv.js"></script>
<link rel="stylesheet" href="https://cdn.jsdelivr.net/npm/dynamsoft-document-viewer@latest/dist/ddv.css">
布局设计
创建一个用于输入详细信息的表单。在表单底部,添加用于生成快递单的按钮,并添加用于填写预设模板内容的按钮。在表单下方,将生成的标签显示在Dynamsoft Document Viewer的Edit Viewer中。我们可以查看文档图像、将图像下载为PDF文件并打印文档。

代码:
<style>
h2 {
  text-align: center;
}

#app {
  display: flex;
  flex-direction: column;
  align-items: center;
}

.form {
  display: flex;
  flex-direction: column;
  width: 80%;
  border: 1px solid lightgray;
  border-radius: 5px;
}

.section {
  padding: 5px 20px;
  width: 100%;
}

#container {
  margin-top: 20px;
  width: 80%;
  height: 480px;
}
<style/>
<div id="app">
  <h2>Online Shipping Label Generator</h2>
  <div class="form">
    <div class="section">
      <h3>Sender:</h3>
      <div>
        <label for="senderName">
          Name: <input id="senderName" type="text"/>
        </label>
      </div>
      <div>
        <label for="senderPhone">
          Phone: <input id="senderPhone" type="text"/>
        </label>
      </div>
      <div>
        <label for="senderAddressLineOne">
          Address line 1: <input id="senderAddressLineOne" type="text"/>
        </label>
      </div>
      <div>
        <label for="senderAddressLineTwo">
          Address line 2: <input id="senderAddressLineTwo" type="text"/>
        </label>
      </div>
      <div>
        <label for="senderCity">
          City: <input id="senderCity" type="text"/>
        </label>
      </div>
      <div>
        <label for="senderState">
          State/Province: <input id="senderState" type="text"/>
        </label>
      </div>
      <div>
        <label for="senderPostalCode">
          Postal code: <input id="senderPostalCode" type="text"/>
        </label>
      </div>
    </div>
    <div class="section">
      <h3>To:</h3>
      <div>
        <label for="receiverName">
          Name: <input id="receiverName" type="text"/>
        </label>
      </div>
      <div>
        <label for="receiverPhone">
          Phone: <input id="receiverPhone" type="text"/>
        </label>
      </div>
      <div>
        <label for="receiverAddressLineOne">
          Address line 1: <input id="receiverAddressLineOne" type="text"/>
        </label>
      </div>
      <div>
        <label for="receiverAddressLineTwo">
          Address line 2: <input id="receiverAddressLineTwo" type="text"/>
        </label>
      </div>
      <div>
        <label for="receiverCity">
          City: <input id="receiverCity" type="text"/>
        </label>
      </div>
      <div>
        <label for="receiverState">
          State/Province: <input id="receiverState" type="text"/>
        </label>
      </div>
      <div>
        <label for="receiverPostalCode">
          Postal code: <input id="receiverPostalCode" type="text"/>
        </label>
      </div>
    </div>
    <div class="section">
      <h3>Other:</h3>
      <label for="packageNumber">
        Package Number: <input id="packageNumber" type="text"/>
      </label>
    </div>
    <div class="section">
      <div>
        <button onclick="generate()">Generate</button>
        <button onclick="fillInTemplate()">Fill in template</button>
      </div>
    </div>
  </div>
  <div class="barcodes" style="display: none;">
    <div id="code128"><canvas id="code128CVS"></canvas></div>
    <div id="qrcode"><canvas id="qrcodeCVS"></canvas></div>
  </div>
  <div id="container"></div>
</div>
生成快递单标签
接下来,让我们使用JavaScript生成快递单标签。
初始化Dynamsoft Document Viewer
-
使用许可证初始化Dynamsoft Document Viewer。可以在这里申请一个证书。
async function initDDV(){ Dynamsoft.DDV.Core.license = "DLS2eyJoYW5kc2hha2VDb2RlIjoiMjAwMDAxLTE2NDk4Mjk3OTI2MzUiLCJvcmdhbml6YXRpb25JRCI6IjIwMDAwMSIsInNlc3Npb25QYXNzd29yZCI6IndTcGR6Vm05WDJrcEQ5YUoifQ=="; // Public trial license which is valid for 24 hours Dynamsoft.DDV.Core.engineResourcePath = "https://cdn.jsdelivr.net/npm/dynamsoft-document-viewer@latest/dist/engine";// Lead to a folder containing the distributed WASM files await Dynamsoft.DDV.Core.loadWasm(); await Dynamsoft.DDV.Core.init(); } -
创建一个新的Edit Viewer的实例和一个文档实例。将Edit Viewer与文档和div容器绑定。
function initEditViewer(){
  // Configure image filter feature
  Dynamsoft.DDV.setProcessingHandler("imageFilter", new Dynamsoft.DDV.ImageFilter());
  // Create an edit viewer
  editViewer = new Dynamsoft.DDV.EditViewer({
    container: "container",
    uiConfig: Dynamsoft.DDV.getDefaultUiConfig("editViewer", {includeAnnotationSet: true}),
  });
  const docManager = Dynamsoft.DDV.documentManager;
  doc = docManager.createDocument();
  editViewer.openDocument(doc.uid);
}
生成条码
使用bwip-js生成条码供之后使用。
-
生成一个Code128格式的条码以表示快递单号。
let code128CVS = bwipjs.toCanvas("code128CVS",{ bcid: 'code128', // Barcode type text: document.getElementById("packageNumber").value, // Text to encode scale: 5, height: 12, // Bar height, in millimeters includetext: true, // Show human-readable text textxalign: 'center', // Always good to set this textcolor: '000000', // Black text }); -
生成一个QR二维码以存储额外信息。
let text = JSON.stringify(getDataFor2D(),null,0);
let qrcodeCVS = bwipjs.toCanvas("qrcodeCVS",{
  bcid:        'qrcode',       // Barcode type
  text:        text,    // Text to encode
  scale:       5
});

function getDataFor2D(){
  let data = {
    "senderName": document.getElementById("senderName").value,
    "receiverName": document.getElementById("receiverName").value,
    "packageNumber": document.getElementById("packageNumber").value
  }
  return data;
}
快递单还常用到其它格式的二维码:
- Maxicode:MaxiCode由美国UPS公司于 1992年创建,用于跟踪和管理包裹的运输。它通常包含有关包裹的结构化承运人消息。
- Aztec:与其他矩阵型条码相比,Aztec码周围不需要空白 “静区”,因此可以节省空间。Aztec代码广泛用于交通票务。
- PDF417:PDF417是一种堆叠式条形码,可以通过简单的线性扫描进行读取,而其他2D代码则需要图像传感器。
在这里,我们使用QR二维码作为示例。
绘制文本和图形
Dynamsoft Document Viewer提供的标注功能,允许我们绘制文本和图形。我们将使用它来绘制快递单。
-
使用Canvas创建A4大小的文档页面,并将其加载到Dynamsoft Document Viewer。
let canvas = document.createElement("canvas"); canvas.width = 2480; //pixels of A4 size in 300 DPI canvas.height = 3508; let context = canvas.getContext('2d'); context.fillStyle = 'rgb(255,255,255)'; context.fillRect(0,0,canvas.width,canvas.height); canvas.toBlob(async (blob) => { await doc.loadSource(blob); }); -
绘制一个快递单大小的矩形。
const pageUid = editViewer.indexToUid(doc.pages.length - 1); let width = 900; // 4 inches -> 900 points in 72 DPI let height = 1350; // 6 inches -> 1350 points in 72 DPI let margin = 50; //margin to the A4 page const options = { x: margin, y: margin, width: width, height: height, borderWidth: 5, borderColor: "black", background: "transparent" } const rect = Dynamsoft.DDV.annotationManager.createAnnotation(pageUid, "rectangle",options); -
绘制二维码。
const qrBlob = await getBarcodeImageBlob("qrcodeCVS"); const qrStampOptions = { x: 90, y: 90, width: 200, height: 200, stamp: qrBlob } const qrStamp = await Dynamsoft.DDV.annotationManager.createAnnotation(pageUid, "stamp", qrStampOptions); function getBarcodeImageBlob(id){ return new Promise((resolve, reject) => { let canvas = document.getElementById(id); canvas.toBlob(async (blob) => { resolve(blob) }); }) } -
绘制在二维码和发件人信息之间的线。
const firstLineOptions = { startPoint: {x:margin, y:340}, endPoint: {x:width+margin, y:340}, borderWidth: 2, borderColor: "black", background: "black" } const firstline = await Dynamsoft.DDV.annotationManager.createAnnotation(pageUid, "line", firstLineOptions); -
使用文本框绘制发件人的信息。
const senderTextBoxOptions = { x: 90, y: 400, width: 600, height: 150, textAlign: "left", borderWidth: 0, textContents: getSenderText() }; const senderTextBox = await Dynamsoft.DDV.annotationManager.createAnnotation(pageUid, "textBox", senderTextBoxOptions); function getSenderText(){ let text = document.getElementById("senderName").value + "\n"; text = text + document.getElementById("senderPhone").value + "\n"; text = text + document.getElementById("senderAddressLineOne").value + "\n"; if (document.getElementById("senderAddressLineTwo").value) { text = text + document.getElementById("senderAddressLineTwo").value + "\n"; } text = text + document.getElementById("senderCity").value + ", " + document.getElementById("senderState").value + " " + document.getElementById("senderPostalCode").value; return [{content: text, fontSize: 22}] } -
使用文本框绘制收件人的信息,并在文本框前面加上”To:”(收件人)。
const toTextBoxOptions = { x: 90, y: 640, width: 50, height: 150, textAlign: "left", borderWidth: 0, textContents: [{"content":"To:","fontWeight":"bold","fontSize":24}] } const toTextBox = await Dynamsoft.DDV.annotationManager.createAnnotation(pageUid, "textBox", toTextBoxOptions); const receiverTextBoxOptions = { x: 140, y: 640, width: 600, height: 150, textAlign: "left", borderWidth: 0, textContents: getReceiverText() }; const receiverTextBox = await Dynamsoft.DDV.annotationManager.createAnnotation(pageUid, "textBox", receiverTextBoxOptions); function getReceiverText(){ let text = document.getElementById("receiverName").value + "\n"; text = text + document.getElementById("receiverPhone").value + "\n"; text = text + document.getElementById("receiverAddressLineOne").value + "\n"; if (document.getElementById("receiverAddressLineTwo").value) { text = text + document.getElementById("receiverAddressLineTwo").value + "\n"; } text = text + document.getElementById("receiverCity").value + ", " + document.getElementById("receiverState").value + " " + document.getElementById("receiverPostalCode").value; return [{content: text, fontSize: 22}] } -
绘制在收件人信息和包裹编号条码之间的线。
const secondLineOptions = { startPoint: {x:margin, y:870}, endPoint: {x:width+margin, y:870}, borderWidth: 2, borderColor: "black", background: "black" } const secondline = await Dynamsoft.DDV.annotationManager.createAnnotation(pageUid, "line", secondLineOptions); -
绘制表示快递单号的Code128条码。
const barcodeBlob = await getBarcodeImageBlob("code128CVS");
const code128Canvas = document.getElementById("code128CVS");
const barcodeWidth = width*0.7
const barcodeHeight = code128Canvas.height/(code128Canvas.width/barcodeWidth);
const barcodeStampOptions = {
  x: 90,
  y: 940,
  width: barcodeWidth,
  height: barcodeHeight,
  stamp: barcodeBlob
}
const barcodeStamp = await Dynamsoft.DDV.annotationManager.createAnnotation(pageUid, "stamp", barcodeStampOptions);
将快递单保存为PDF
我们可以使用文档实例的saveToPdf函数将快递单保存为PDF文件。
const pdfSettings = {
  saveAnnotation: "annotation"
};
const blob = await doc.saveToPdf(pdfSettings);
打印快递单
我们也可以使用文档实例的print函数直接打印它。
doc.print({
  printAnnotation: true
});
源代码
查看demo的源代码并尝试使用:
