扫描文档后,我们通常需要对其进行清理和修复,以优化其质量。有几种优化的方法:
-
应用图像滤镜。
我们可以将图像转换为黑白,以清洁背景并提高对比度。在下面的示例中,可以看到噪点和阴影都可以去除。
原图:

黑白图:

此外,转换为黑白还可以减小图像大小。
-
使用自由画笔或者图像修复来去除不想要的目标。如果我们需要还原背景,图像修复是更好的选择。这种技术通常用于修复旧照片。
修复过程如下所示。
原图:

掩膜:

修复的:

在本文中,我们将创建一个前端应用,使用Dynamsoft Document ViewerSDK清理和修复扫描的文档。
新建HTML文件
创建一个包含以下内容的新HTML文件:
<!DOCTYPE html>
<html lang="en">
<head>
  <meta charset="UTF-8">
  <meta http-equiv="X-UA-Compatible" content="IE=edge">
  <meta name="viewport" content="width=device-width, initial-scale=1.0, minimum-scale=1.0, maximum-scale=1.0, user-scalable=no">
  <title>Clean up and Repair Documents</title>
  <style>
    .container {
      display: flex;
      align-items: center;
      flex-direction: column;
    }

    .container h2 {
      text-align: center;
    }

    #viewer {
      max-width: 1024px;
      width: 100%;
      height: 600px;
    }

    @media screen and (max-device-width: 600px){
      #viewer {
        width: 100%;
        height: 480px;
      }
    }
  </style>
</head>
<body>
  <div class="container">
    <h2>Clean up and Repair Scanned Documents</h2>
    <label>
      Select an image:
      <br/>
      <input type="file" id="files" name="files" onchange="filesSelected()"/>
    </label>
    <div id="viewer"></div>
  </div>
</body>
<script>
</script>
</html>
添加依赖项
-
添加Dynamsoft Document Viewer SDK。
<script src="https://cdn.jsdelivr.net/npm/dynamsoft-document-viewer@2.0.0/dist/ddv.js"></script> <link rel="stylesheet" href="https://cdn.jsdelivr.net/npm/dynamsoft-document-viewer@2.0.0/dist/ddv.css"> -
添加
inpaint库。<script type="text/javascript" src="https://tony-xlh.github.io/clean-and-repair-scanned-documents/inpaint.js"></script> <script type="text/javascript" src="https://tony-xlh.github.io/clean-and-repair-scanned-documents/heapqueue.js"></script>
初始化Dynamsoft Document Viewer
-
使用证书初始化SDK。可以在这里申请一个证书。
let oneDayTrialLicense = "DLS2eyJoYW5kc2hha2VDb2RlIjoiMjAwMDAxLTE2NDk4Mjk3OTI2MzUiLCJvcmdhbml6YXRpb25JRCI6IjIwMDAwMSIsInNlc3Npb25QYXNzd29yZCI6IndTcGR6Vm05WDJrcEQ5YUoifQ=="; Dynamsoft.DDV.Core.license = oneDayTrialLicense; Dynamsoft.DDV.Core.engineResourcePath = "https://cdn.jsdelivr.net/npm/dynamsoft-document-viewer@2.0.0/dist/engine";// Lead to a folder containing the distributed WASM files await Dynamsoft.DDV.Core.init(); -
创建一个文档实例。
const docManager = Dynamsoft.DDV.documentManager; doc = docManager.createDocument(); -
创建一个新的Edit Viewer的实例并打开创建的文档实例。
Dynamsoft.DDV.setProcessingHandler("imageFilter", new Dynamsoft.DDV.ImageFilter()); let uiConfig = { type: "Layout", flexDirection: "column", className: "ddv-edit-viewer-desktop", children: [ { type: "Layout", className: "ddv-edit-viewer-header-desktop", children: [ { type: "Layout", children: [ "ThumbnailSwitch", "Zoom", "FitMode", "DisplayMode", "RotateLeft", "RotateRight", "Crop", "Filter", "Undo", "Redo", "DeleteCurrent", "DeleteAll", "Pan", "SeparatorLine", "InkAnnotation", ], enableScroll: true }, { type: "Layout", children: [ { "type": "Pagination", "className": "ddv-edit-viewer-pagination-desktop" }, "Download" ] } ] }, "MainView" ] } editViewer = new Dynamsoft.DDV.EditViewer({ uiConfig: uiConfig, container: document.getElementById("viewer") }); editViewer.openDocument(doc.uid); -
选择图像或PDF文件并加载。
async function filesSelected(){
  let filesInput = document.getElementById("files");
  let files = filesInput.files;
  if (files.length>0) {
    for (let index = 0; index < files.length; index++) {
      const file = files[index];
      const blob = await readFileAsBlob(file);
      await doc.loadSource(blob);
    }
  }
}

function readFileAsBlob(file){
  return new Promise((resolve, reject) => {
    const fileReader = new FileReader();
    fileReader.onload = async function(e){
      const response = await fetch(e.target.result);
      const blob = await response.blob();
      resolve(blob);
    };
    fileReader.onerror = function () {
      reject('oops, something went wrong.');
    };
    fileReader.readAsDataURL(file);
  })
}
打开页面并加载一个文件,我们可以看到如下界面:

使用图像滤镜
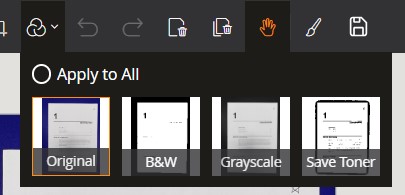
我们可以使用工具栏上的图标应用图像滤镜。

默认有三个滤镜:
- 灰度:将图像转换为灰度
- 黑白:将图像转换为黑白
- 省墨:以节省打印时墨水的方式将图像转换为黑白
也可以通过代码应用滤镜,甚至定义自己的滤镜。查看文档以了解更多信息。
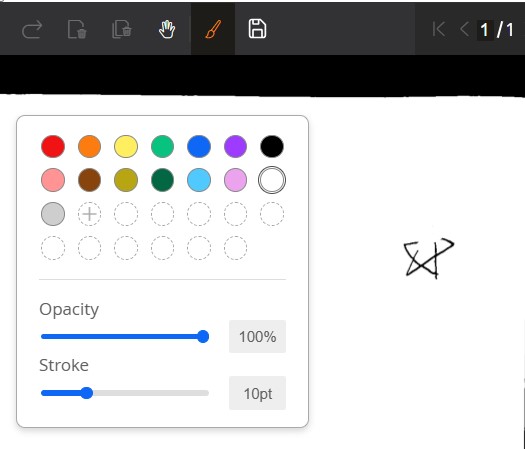
自由画笔
点击墨水批注图标,我们可以自由绘制形状来覆盖对象。

图像修复
接下来,我们可以使用墨水批注来绘制用于图像修复的掩膜。
-
添加一个复选框,以启用使用墨水批注工具进行图像修复。
function addInpaintingModeCheckbox(){ const html = ` <div class="ddv-palette-mode-panel" style="width: 85%;"> <label> Inpainting mode <input type="checkbox" id="inpainingMode"> </label> </div> ` let container = document.createElement("div"); document.getElementById("viewer").getElementsByClassName("ddv-palette-box")[0].appendChild(container); container.outerHTML = html; } -
监听是否添加了新批注。如果是墨水批注,则进行图像修复。我们将在下面的步骤中讨论如何实现图像修复。
Dynamsoft.DDV.annotationManager.on("annotationsAdded",(e) => { if (document.getElementById("inpainingMode").checked) { let uid = e.annotationUids[0]; let annotation = Dynamsoft.DDV.annotationManager.getAnnotationsByUids([uid])[0]; let options = annotation.getOptions(); let pointsOfStrokes = options.points; if (!pointsOfStrokes) { //not ink annotation return; } inpaint(uid); } }) -
获取墨水批注的外接矩形。为它添加一些边距。我们将以它为单位裁剪和修复图像。
function inpaint(uid) { let annotation = Dynamsoft.DDV.annotationManager.getAnnotationsByUids([uid])[0]; let options = annotation.getOptions(); let pointsOfStrokes = options.points; let borderWidth = options.borderWidth; let rect = await getRectForInpainting(pointsOfStrokes,borderWidth); } async function getRectForInpainting(pointsOfStrokes,borderWidth){ const pageIndex = editViewer.getCurrentPageIndex(); const pageUid = editViewer.indexToUid(pageIndex); const pageData = await doc.getPageData(pageUid); let halfLineWidth = borderWidth/2; let minX,minY,maxX,maxY; maxX = 0; maxY = 0; console.log(pointsOfStrokes); for (let i = 0; i < pointsOfStrokes.length; i++) { const pointsOfStroke = pointsOfStrokes[i]; for (let j = 0; j < pointsOfStroke.length; j++) { const point = pointsOfStroke[j]; if (!minX) { minX = point.x; }else{ minX = Math.min(minX,point.x); } if (!minY) { minY = point.y; }else{ minY = Math.min(minY,point.y); } maxX = Math.max(maxX,point.x); maxY = Math.max(maxY,point.y); } } maxX = maxX + halfLineWidth; maxY = maxY + halfLineWidth; let x = minX - halfLineWidth; let y = minY - halfLineWidth; //add padding x = Math.max(x - borderWidth, 0) y = Math.max(y - borderWidth, 0) maxX = Math.min(maxX + borderWidth*2, pageData.mediaBox.width); maxY = Math.min(maxY + borderWidth*2, pageData.mediaBox.height); let width = maxX - minX + halfLineWidth; let height = maxY - minY + halfLineWidth; return {x:x,y:y,width:width,height:height}; } -
默认坐标单位是点。我们需要转换值为像素。
function inpaint(){ //... let {scaleX,scaleY} = await getScale(); let rectInPixels = {x:rect.x / scaleX,y:rect.y / scaleY,width:rect.width / scaleX,height:rect.height / scaleY}; } async function getScale(){ const pageIndex = editViewer.getCurrentPageIndex(); const pageUid = editViewer.indexToUid(pageIndex); const pageData = await doc.getPageData(pageUid); const scaleX = pageData.mediaBox.width / pageData.raw.width; const scaleY = pageData.mediaBox.height / pageData.raw.height; return {scaleX:scaleX,scaleY:scaleY}; } -
将裁剪后的原图放入一个canvas中。
function inpaint(){ //... let srcImageCanvas = await getSourceImageForInpainting(rectInPixels); } function getSourceImageForInpainting(rect){ return new Promise(async (resolve, reject) => { const result = await doc.saveToJpeg(editViewer.getCurrentPageIndex(),{quality:100,saveAnnotation:true}); const canvas = document.createElement("canvas"); const img = document.createElement("img"); const url = URL.createObjectURL(result); img.onload = function(){ canvas.width = rect.width; canvas.height = rect.height; let ctx = canvas.getContext("2d"); ctx.drawImage(img, rect.x, rect.y, rect.width, rect.height, 0, 0, rect.width, rect.height); resolve(canvas); } img.src = url; }) } -
使用canvas绘制掩膜。
function inpaint(){ //... let maskImageCanvas = getMaskImageForInpainting(pointsOfStrokes,borderWidth,rect,rectInPixels,scaleX,scaleY); } function getMaskImageForInpainting(pointsOfStrokes,stroke,rect,rectInPixels,scaleX,scaleY){ let canvas = document.createElement("canvas"); canvas.width = rectInPixels.width; canvas.height = rectInPixels.height; const ctx = canvas.getContext("2d"); ctx.fillStyle = "black"; ctx.fillRect(0,0,canvas.width,canvas.height); for (let i = 0; i < pointsOfStrokes.length; i++) { const pointsOfStroke = pointsOfStrokes[i]; ctx.beginPath(); for (let j = 0; j < pointsOfStroke.length; j++) { const point = pointsOfStroke[j]; const x = (point.x - rect.x) / scaleX; const y = (point.y - rect.y) / scaleY; if (j === 0) { ctx.moveTo(x, y); }else{ ctx.lineTo(x, y); } } ctx.strokeStyle = "red"; ctx.lineWidth = stroke / scaleX; ctx.stroke(); } return canvas; } -
执行修复。
function inpaint(){ //... let srcCtx = srcImageCanvas.getContext("2d"); let maskCtx = maskImageCanvas.getContext("2d"); let srcImageData = srcCtx.getImageData(0, 0, srcImageCanvas.width, srcImageCanvas.height); let maskImageData = maskCtx.getImageData(0, 0, maskImageCanvas.width, maskImageCanvas.height); let width = srcImageData.width; let height = srcImageData.height; let mask_u8 = new Uint8Array(width * height); for(let i = 0; i < maskImageData.data.length / 4; i++){ let r = maskImageData.data[4 * i]; let g = maskImageData.data[4 * i + 1]; let b = maskImageData.data[4 * i + 2]; if(r > 0 || g > 0 || b > 0){ let rad = 6 for(let dx = -rad; dx <= rad; dx++){ for(let dy = -rad; dy <= rad; dy++){ if(dx * dx + dy * dy <= rad * rad){ mask_u8[i + dx + dy * width] = 1; } } } } } let img_u8 = new Uint8Array(width * height) for(let channel = 0; channel < 3; channel++){ for(let n = 0; n < srcImageData.data.length; n+=4){ img_u8[n / 4] = srcImageData.data[n + channel] } InpaintTelea(width, height, img_u8, mask_u8) for(let i = 0; i < img_u8.length; i++){ srcImageData.data[4 * i + channel] = img_u8[i] } } // render result back to canvas for(let i = 0; i < img_u8.length; i++){ srcImageData.data[4 * i + 3] = 255; } let output = document.createElement("canvas"); output.width = rectInPixels.width; output.height = rectInPixels.height; let ctx = output.getContext("2d"); ctx.putImageData(srcImageData, 0, 0); } -
将修复的部分作为批注插入文档。
function inpaint(){
  //...
  output.toBlob(
    (blob) => {
      insertInpaintedImage(blob,rect);
    },
    "image/png"
  );
}
async function insertInpaintedImage(blob,rect){
  const pageIndex = editViewer.getCurrentPageIndex();
  const pageUid = editViewer.indexToUid(pageIndex);
  const options = {
    x: rect.x,
    y: rect.y,
    width: rect.width,
    height: rect.height,
    stamp: blob
  }
  const stamp = await Dynamsoft.DDV.annotationManager.createAnnotation(pageUid, "stamp", options);
}
好了,我们已经完成了这个demo。
源代码
查看demo的源代码并尝试使用:
https://github.com/tony-xlh/clean-and-repair-scanned-documents
