
Dynamsoft Label Recognizer是一个用于识别区域文本的SDK。其主要用例是读取护照、身份证件上的MRZ(机器可读区域)。
在本文中,我们将使用Dynamsoft Label Recognizer和Swift编写一个iOS MRZ扫描应用。
最终结果的演示视频:
新建项目
打开Xcode并创建一个新的基于UIKit和Swift的应用项目。
由于我们将以代码方式操作UI,因此可以删除Main.storyboard和SceneDelegate.swift并更新项目和Info.plist。
添加依赖项
在这里,我们使用CocoaPods来管理依赖项。
-
在项目文件夹中初始化pod。
pod init -
将以下行添加到
Podfile。pod "DynamsoftCore", "= 2.0.2" pod "DynamsoftLabelRecognizer", '= 2.2.20' -
运行
pod install
添加权限
将以下内容添加到Info.plist,以获得访问摄像头的权限。
<key>NSCameraUsageDescription</key>
<string>For camera usage</string>
初始化Dynamsoft Label Recognizer的许可证
在AppDelegate.swift中,添加以下内容以初始化Dynamsoft Label Recognizer的许可证。可以在此处申请一个30天试用许可证。
@main
class AppDelegate: UIResponder, UIApplicationDelegate, LicenseVerificationListener  {
    func application(_ application: UIApplication, didFinishLaunchingWithOptions launchOptions: [UIApplication.LaunchOptionsKey: Any]?) -> Bool {
        // Override point for customization after application launch.
        let trialLicense = "DLS2eyJoYW5kc2hha2VDb2RlIjoiMjAwMDAxLTE2NDk4Mjk3OTI2MzUiLCJvcmdhbml6YXRpb25JRCI6IjIwMDAwMSIsInNlc3Npb25QYXNzd29yZCI6IndTcGR6Vm05WDJrcEQ5YUoifQ=="; //one-day public trial
        DynamsoftLicenseManager.initLicense(trialLicense,verificationDelegate:self)
        return true
    }

    func licenseVerificationCallback(_ isSuccess: Bool, error: Error?) {
        var msg:String? = ""
        if isSuccess {
            print("license valid")
        }
        if(error != nil)
        {
            let err = error as NSError?
            if err?.code == -1009 {
                msg = "Dynamsoft Label Recognizer is unable to connect to the public Internet to acquire a license. Please connect your device to the Internet or contact support@dynamsoft.com to acquire an offline license."
            }else{
                msg = err!.userInfo[NSUnderlyingErrorKey] as? String
                if(msg == nil)
                {
                    msg = err?.localizedDescription
                }
            }
            print(msg ?? "")
        }
    }
}
接下来,我们将分步实现页面。有两个页面:主页和摄像头页面。
主页
添加Scan MRZ按钮以导航到摄像头页面。
class ViewController: UIViewController {
    var button: UIButton!
    override func viewDidLoad() {
        super.viewDidLoad()
        // Do any additional setup after loading the view.

        self.button = UIButton(frame: .zero)
        self.button.setTitle("Scan MRZ", for: .normal)
        self.button.setTitleColor(.systemBlue, for: .normal)
        self.button.setTitleColor(.lightGray, for: .highlighted)

        self.button.addTarget(self,
                         action: #selector(buttonAction),
                         for: .touchUpInside)
        self.navigationItem.title = "Home"

        self.view.backgroundColor = UIColor.white
        self.view.addSubview(self.button)
    }

    override func viewDidLayoutSubviews() {
        super.viewDidLayoutSubviews()
        if let button = self.button {
            let width: CGFloat = 300
            let height: CGFloat = 50
            let x = view.frame.width/2 - width/2
            let y = view.frame.height - 100
            button.frame = CGRect.init(x: x, y: y, width: width, height: height)
        }
    }

    @objc
    func buttonAction() {
        self.navigationController?.pushViewController(CameraController(), animated: true)
    }
}
由于我们没有使用storyboard,因此需要在AppDelegate.swift中使用以下代码显示主页。
@main
class AppDelegate: UIResponder, UIApplicationDelegate, LicenseVerificationListener  {
    var window: UIWindow?
    func application(_ application: UIApplication, didFinishLaunchingWithOptions launchOptions: [UIApplication.LaunchOptionsKey: Any]?) -> Bool {
        // Override point for customization after application launch.
        window = UIWindow(frame: UIScreen.main.bounds)
        let vc = ViewController()
        let navController = UINavigationController(rootViewController: vc)
        window?.rootViewController = navController
        window?.makeKeyAndVisible()
        //...
        return true
    }
}
摄像头页面
创建一个名为CameraController.swift的新的视图控制器。然后,我们将在此页面启动摄像头并扫描MRZ。
使用AVFoundation启动摄像头
-
创建名为
PreviewView的视图来显示摄像头预览。import UIKit //https://developer.apple.com/documentation/avfoundation/capture_setup/setting_up_a_capture_session?language=objc#2958852 class PreviewView: UIView { override class var layerClass: AnyClass { return AVCaptureVideoPreviewLayer.self } /// Convenience wrapper to get layer as its statically known type. var videoPreviewLayer: AVCaptureVideoPreviewLayer { return layer as! AVCaptureVideoPreviewLayer } } -
将PreviewView添加到摄像头控制器。
var previewView: PreviewView! override func viewDidLoad() { super.viewDidLoad() self.previewView = PreviewView() self.view.addSubview(self.previewView) } override func viewDidLayoutSubviews() { super.viewDidLayoutSubviews() if let previewView = self.previewView { let width: CGFloat = view.frame.width let height: CGFloat = view.frame.height let x: CGFloat = 0.0 let y: CGFloat = 0.0 previewView.frame = CGRect.init(x: x, y: y, width: width, height: height) } } -
打开摄像头并开始捕获会话。
var captureSession: AVCaptureSession!
func startCamera(){
    // Create the capture session.
    self.captureSession = AVCaptureSession()

    // Find the default video device.
    guard let videoDevice = AVCaptureDevice.default(for: .video) else { return }

    do {
        // Wrap the video device in a capture device input.
        let videoInput = try AVCaptureDeviceInput(device: videoDevice)
        // If the input can be added, add it to the session.
        if self.captureSession.canAddInput(videoInput) {
            self.captureSession.addInput(videoInput)
            self.previewView.videoPreviewLayer.session = self.captureSession

            //set the camera preview's resolution
            self.captureSession.sessionPreset = AVCaptureSession.Preset.hd1920x1080

            self.captureSession.startRunning()
        }
    } catch {
        // Configuration failed. Handle error.
    }
}
从相机预览扫描MRZ
-
导入库。
import DynamsoftCore import DynamsoftLabelRecognizer -
创建Label Recognizer实例。
var recognizer:DynamsoftLabelRecognizer = DynamsoftLabelRecognizer(); -
加载MRZ模型。
-
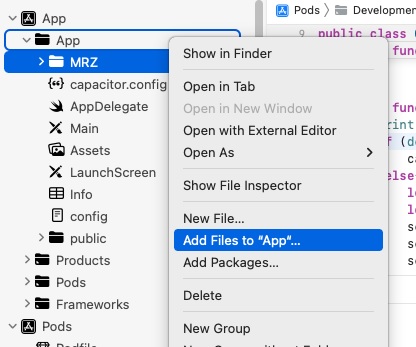
将MRZ模型文件夹以reference的形式添加。可以在此处找到这些文件。
-
使用代码加载模型文件。
func loadModel(){
    let modelFolder = "MRZ"
    let modelFileNames = ["MRZ"]

    for model in modelFileNames {

        guard let prototxt = Bundle.main.url(
            forResource: model,
            withExtension: "prototxt",
            subdirectory: modelFolder
        ) else {
            print("model not exist")
            return
        }

        let datapro = try! Data.init(contentsOf: prototxt)
        let txt = Bundle.main.url(forResource: model, withExtension: "txt", subdirectory: modelFolder)
        let datatxt = try! Data.init(contentsOf: txt!)
        let caffemodel = Bundle.main.url(forResource: model, withExtension: "caffemodel", subdirectory: modelFolder)
        let datacaf = try! Data.init(contentsOf: caffemodel!)
        DynamsoftLabelRecognizer.appendCharacterModel(model, prototxtBuffer: datapro, txtBuffer: datatxt, characterModelBuffer: datacaf)
        print("load model %@", model)
    }
}
-
-
更新Label Recognizer的设置以识别MRZ。
let template = "{\"CharacterModelArray\":[{\"DirectoryPath\":\"\",\"Name\":\"MRZ\"}],\"LabelRecognizerParameterArray\":[{\"Name\":\"default\",\"ReferenceRegionNameArray\":[\"defaultReferenceRegion\"],\"CharacterModelName\":\"MRZ\",\"LetterHeightRange\":[5,1000,1],\"LineStringLengthRange\":[30,44],\"LineStringRegExPattern\":\"([ACI][A-Z<][A-Z<]{3}[A-Z0-9<]{9}[0-9][A-Z0-9<]{15}){(30)}|([0-9]{2}[(01-12)][(01-31)][0-9][MF<][0-9]{2}[(01-12)][(01-31)][0-9][A-Z<]{3}[A-Z0-9<]{11}[0-9]){(30)}|([A-Z<]{0,26}[A-Z]{1,3}[(<<)][A-Z]{1,3}[A-Z<]{0,26}<{0,26}){(30)}|([ACIV][A-Z<][A-Z<]{3}([A-Z<]{0,27}[A-Z]{1,3}[(<<)][A-Z]{1,3}[A-Z<]{0,27}){(31)}){(36)}|([A-Z0-9<]{9}[0-9][A-Z<]{3}[0-9]{2}[(01-12)][(01-31)][0-9][MF<][0-9]{2}[(01-12)][(01-31)][0-9][A-Z0-9<]{8}){(36)}|([PV][A-Z<][A-Z<]{3}([A-Z<]{0,35}[A-Z]{1,3}[(<<)][A-Z]{1,3}[A-Z<]{0,35}<{0,35}){(39)}){(44)}|([A-Z0-9<]{9}[0-9][A-Z<]{3}[0-9]{2}[(01-12)][(01-31)][0-9][MF<][0-9]{2}[(01-12)][(01-31)][0-9][A-Z0-9<]{14}[A-Z0-9<]{2}){(44)}\",\"MaxLineCharacterSpacing\":130,\"TextureDetectionModes\":[{\"Mode\":\"TDM_GENERAL_WIDTH_CONCENTRATION\",\"Sensitivity\":8}],\"Timeout\":9999}],\"LineSpecificationArray\":[{\"BinarizationModes\":[{\"BlockSizeX\":30,\"BlockSizeY\":30,\"Mode\":\"BM_LOCAL_BLOCK\",\"MorphOperation\":\"Close\"}],\"LineNumber\":\"\",\"Name\":\"defaultTextArea->L0\"}],\"ReferenceRegionArray\":[{\"Localization\":{\"FirstPoint\":[0,0],\"SecondPoint\":[100,0],\"ThirdPoint\":[100,100],\"FourthPoint\":[0,100],\"MeasuredByPercentage\":1,\"SourceType\":\"LST_MANUAL_SPECIFICATION\"},\"Name\":\"defaultReferenceRegion\",\"TextAreaNameArray\":[\"defaultTextArea\"]}],\"TextAreaArray\":[{\"Name\":\"defaultTextArea\",\"LineSpecificationNameArray\":[\"defaultTextArea->L0\"]}]}" try? recognizer.initRuntimeSettings(template) -
添加视频输出,以便我们可以获取相机预览的数据。
func startCamera(){ // Create the capture session. self.captureSession = AVCaptureSession() // Find the default video device. guard let videoDevice = AVCaptureDevice.default(for: .video) else { return } do { // Wrap the video device in a capture device input. let videoInput = try AVCaptureDeviceInput(device: videoDevice) // If the input can be added, add it to the session. if self.captureSession.canAddInput(videoInput) { self.captureSession.addInput(videoInput) self.previewView.videoPreviewLayer.session = self.captureSession //set the camera preview's resolution self.captureSession.sessionPreset = AVCaptureSession.Preset.hd1920x1080 + self.videoOutput = AVCaptureVideoDataOutput.init() + if self.captureSession.canAddOutput(self.videoOutput) { + self.captureSession.addOutput(videoOutput) + } + + var queue:DispatchQueue + queue = DispatchQueue(label: "queue") + self.videoOutput.setSampleBufferDelegate(self as AVCaptureVideoDataOutputSampleBufferDelegate, queue: queue) + self.videoOutput.videoSettings = [kCVPixelBufferPixelFormatTypeKey : kCVPixelFormatType_32BGRA] as [String : Any] self.captureSession.startRunning() } } catch { // Configuration failed. Handle error. } } + func captureOutput(_ output: AVCaptureOutput, didOutput sampleBuffer: CMSampleBuffer, from connection: AVCaptureConnection){ + print("capture output") + } -
将
CMSampleBuffer转换为iImageData,然后使用Dynamsoft Label Recognizer扫描MRZ。//convert CMSampleBuffer to iImageData let imageBuffer:CVImageBuffer = CMSampleBufferGetImageBuffer(sampleBuffer)! CVPixelBufferLockBaseAddress(imageBuffer, .readOnly) let baseAddress = CVPixelBufferGetBaseAddress(imageBuffer) let bufferSize = CVPixelBufferGetDataSize(imageBuffer) let width = CVPixelBufferGetWidth(imageBuffer) let height = CVPixelBufferGetHeight(imageBuffer) let bpr = CVPixelBufferGetBytesPerRow(imageBuffer) CVPixelBufferUnlockBaseAddress(imageBuffer, .readOnly) let buffer = Data(bytes: baseAddress!, count: bufferSize) let imageData = iImageData.init() imageData.bytes = buffer imageData.width = width imageData.height = height imageData.stride = bpr imageData.format = .ARGB_8888 //recognize text from the image data let results = try? recognizer.recognizeBuffer(imageData)
处理方向
摄像头传感器的自然方向是当手机处于横向右(主页按钮在右侧)时的方向。如果我们以纵向握持手机,视频帧的方向不会改变,但预览可以被旋转以配合显示。我们需要处理方向,以便Label Recognizer能够识别文本。
-
添加一个监听器来监听方向的变化。
override func viewDidLoad() { NotificationCenter.default.addObserver(self, selector: #selector(rotated), name: UIDevice.orientationDidChangeNotification, object: nil) } -
更新预览视图的边界,并根据设备的方向更新视频方向。
@objc func rotated() { let bounds = view.bounds self.previewView.frame = bounds if UIDevice.current.orientation == UIDeviceOrientation.portrait { self.previewView.videoPreviewLayer.connection?.videoOrientation = .portrait }else if UIDevice.current.orientation == UIDeviceOrientation.landscapeLeft { self.previewView.videoPreviewLayer.connection?.videoOrientation = .landscapeRight }else if UIDevice.current.orientation == UIDeviceOrientation.landscapeRight { self.previewView.videoPreviewLayer.connection?.videoOrientation = .landscapeLeft } } -
设置图像数据的方向属性,以便Label Recognizer可以正确处理方向。
if self.previewView.videoPreviewLayer.connection?.videoOrientation == .portrait {
    imageData.orientation = 90
}else if self.previewView.videoPreviewLayer.connection?.videoOrientation == .landscapeLeft {
    imageData.orientation = 180
}
验证识别结果
单帧的识别结果可能包含错误识别的字符。我们可以存储连续识别到的结果,并检查结果是否彼此匹配,以确保我们得到可靠的结果。
以下是执行此操作的代码:
var scannedResults:[String] = []
func isSteady(results:[iDLRResult]) -> Bool {
    let str = getMRZString(results: results)
    if scannedResults.count == 5 {
        var correctNumber = 0
        for scannedResult in scannedResults {
            if str == scannedResult {
                correctNumber = correctNumber + 1
            }
        }
        if correctNumber >= 2 { // among 5 results, at least 2 are the same
            return true
        }else{
            scannedResults.remove(at: 0)
            scannedResults.append(str)
        }
    }else{
        scannedResults.append(str)
    }
    return false
}

func getMRZString(results:[iDLRResult]) -> String{
    var MRZString = ""
    for lineResult in results[0].lineResults! {
        print(lineResult.text!)
        MRZString = MRZString + lineResult.text! + "\n"
    }
    return MRZString
}
解析MRZ
最后,我们可以使用第三方解析器来解析结果。
import QKMRZParser

var mrzLines:[String] = []
for lineResult in results![0].lineResults! {
    mrzLines.append(lineResult.text!)
}

let mrzParser = QKMRZParser(ocrCorrection: true)
let result = mrzParser.parse(mrzLines: mrzLines)

var parsed = ""
parsed = parsed + "No.: " + result!.documentNumber + "\n"
parsed = parsed + "Country.: " + result!.countryCode + "\n"
parsed = parsed + "Given names: " + result!.givenNames + "\n"
parsed = parsed + "Surname: " + result!.surnames + "\n"
let dateFormatter = DateFormatter()
dateFormatter.dateFormat = "d.M.yyyy"
parsed = parsed + "Date of birth: " + dateFormatter.string(from: result!.birthdate!) + "\n"
self.label.text = parsed
源代码
欢迎下载源代码并尝试使用:https://github.com/tony-xlh/iOS-MRZ-Scanner