
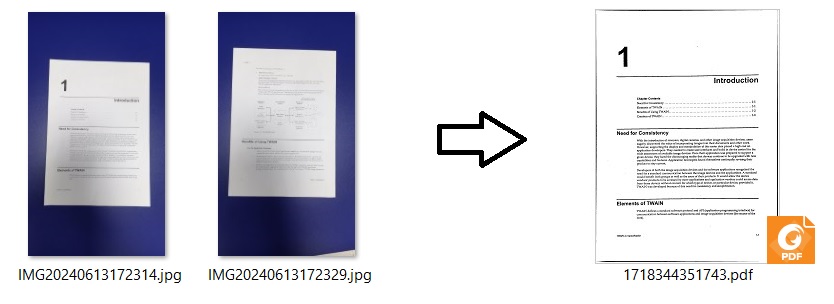
有时,我们可能需要将多个图像合并到单个PDF文件中。例如,扫描身份证的正面和背面,并将它们存储在一个PDF文件中。
在本文中,我们将讨论如何使用Swift编写一个iOS应用,利用Dynamsoft Document Normalizer将图像合并到PDF文件中。
新建项目
打开Xcode并创建一个新的应用项目。
添加依赖项
接下来,通过cocoapods添加Dynamsoft Document Normalizer及其依赖项。
-
初始化Pod。
pod init -
将以下内容添加到
Podfile。target 'PDFCreator' do pod 'DynamsoftCaptureVisionRouter','2.2.30' pod 'DynamsoftCore','3.2.30' pod 'DynamsoftDocumentNormalizer','2.2.11' pod 'DynamsoftImageProcessing','2.2.30' pod 'DynamsoftLicense','3.2.20' pod 'DynamsoftUtility','1.2.20' end -
安装Pod。
pod install
界面设计
打开Main.storyboard并添加以下控件:
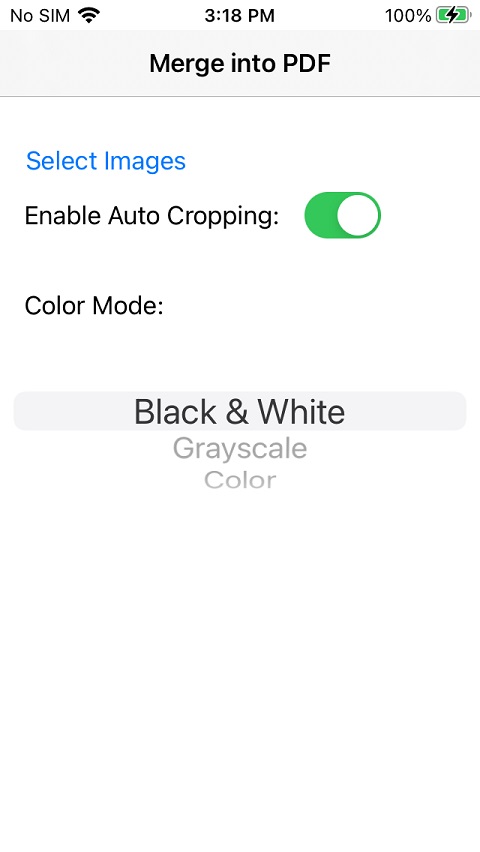
它包含一个用于从图库中选择图像的按钮,一个用于启用自动裁剪文档的开关,以及用于选择颜色模式的选取器。
选取器使用以下代码进行配置:
@IBOutlet weak var colorModeUIPickerView: UIPickerView!
func numberOfComponents(in pickerView: UIPickerView) -> Int {
    return 1
}

func pickerView(_ pickerView: UIPickerView, numberOfRowsInComponent component: Int) -> Int {
    return 3
}

func pickerView(_ pickerView: UIPickerView, titleForRow row: Int,
                    forComponent component: Int) -> String? {
    if row == 0 {
        return "Black & White"
    }else if row == 1 {
        return "Grayscale"
    }else{
        return "Color"
    }
}


override func viewDidLoad() {
    super.viewDidLoad()
    // Do any additional setup after loading the view.
    colorModeUIPickerView.dataSource = self
    colorModeUIPickerView.delegate = self
}
从图库中选择图像
这里,我们使用PHPickerViewController来选择多个图像。
@IBAction func selectImagesUIButton_clicked(_ sender: Any) {

    var configuration = PHPickerConfiguration(photoLibrary: .shared())
    //0 - unlimited 1 - default
    configuration.selectionLimit = 0
    configuration.filter = .images
    let pickerViewController = PHPickerViewController(configuration: configuration)
    pickerViewController.delegate = self
    present(pickerViewController, animated: true)
}

func picker(_ picker: PHPickerViewController, didFinishPicking results: [PHPickerResult]) {
    print(results.count)
    picker.dismiss(animated: true)
}
可以将结果转换为UIImage的数组以供后续使用。
DispatchQueue.main.async {
    var images:[UIImage] = []
    var processed = 0
    let size = results.count
    for item in results {
        if (item.itemProvider.canLoadObject(ofClass: UIImage.self)) {
            item.itemProvider.loadObject(ofClass: UIImage.self) { image , error  in
                if let error{
                    print(error)
                }
                if let selectedImage = image as? UIImage{
                    print(selectedImage.size)
                    images.append(selectedImage)
                    processed = processed + 1
                }
            }
        }
    }
}
使用Dynamsoft Document Normalizer将图像合并为PDF
-
在
AppDelegate.swift中初始化Dynamsoft Document Normalizer的许可证。可以在此处 申请许可证。import DynamsoftLicense func application(_ application: UIApplication, didFinishLaunchingWithOptions launchOptions: [UIApplication.LaunchOptionsKey: Any]?) -> Bool { // Override point for customization after application launch. let oneDayTrial = "DLS2eyJoYW5kc2hha2VDb2RlIjoiMjAwMDAxLTE2NDk4Mjk3OTI2MzUiLCJvcmdhbml6YXRpb25JRCI6IjIwMDAwMSIsInNlc3Npb25QYXNzd29yZCI6IndTcGR6Vm05WDJrcEQ5YUoifQ==" LicenseManager.initLicense(oneDayTrial, verificationDelegate: self) return true } func onLicenseVerified(_ isSuccess: Bool, error: (any Error)?) { if isSuccess == false { print("license invalid") }else{ print("license valid") } } -
创建Capture Vision Router的实例以调用Dynamsoft Document Normalizer。
import DynamsoftCore import DynamsoftCaptureVisionRouter let cvr:CaptureVisionRouter = CaptureVisionRouter() -
处理图像并将其保存为PDF文件。它使用Capture Vision Router处理图像,使用Image Manager保存结果为PDF文件,然后再分享它,以便我们可以保存它到本地文件中。
如果
enableAutoCroppingUISwitch打开,它将检测文档边界并获取裁剪后的图像。否则,处理整个图像。这段代码还指定了颜色模式。将图像转换为黑白可以清理背景并减少文件的大小。转换为灰度的话,能在文件大小和图像细节上取得一个平衡。
import DynamsoftDocumentNormalizer
import DynamsoftUtility
func mergeImagesIntoPDF(images:[UIImage]) {
    var enableAutoCropping = false
    var selectedColorModeIndex = 0
    DispatchQueue.main.sync {
        statusLabel.text = "Processing..."

        if enableAutoCroppingUISwitch.isOn {
            enableAutoCropping = true
        }
        selectedColorModeIndex = colorModeUIPickerView.selectedRow(inComponent: 0)
    }
    let templateName:String;
    if enableAutoCropping {
        templateName = PresetTemplate.detectAndNormalizeDocument.rawValue
    }else{
        templateName = PresetTemplate.normalizeDocument.rawValue
    }
    var settings = try? cvr.getSimplifiedSettings(templateName)

    if selectedColorModeIndex == 0 {
        settings?.documentSettings?.colourMode = ImageColourMode.binary
    }else if selectedColorModeIndex == 1 {
        settings?.documentSettings?.colourMode = ImageColourMode.grayscale
    }else{
        settings?.documentSettings?.colourMode = ImageColourMode.colour
    }
    if enableAutoCropping == false {
        settings?.roi = Quadrilateral(pointArray: [CGPoint(x:0,y:0),CGPoint(x:100,y:0),CGPoint(x:100,y:100),CGPoint(x:0,y:100)])
        settings?.roiMeasuredInPercentage = true
    }
    try? cvr.updateSettings(templateName, settings: settings!)

    let imageManager = ImageManager()
    let url = FileManager.default.temporaryDirectory
                                                    .appendingPathComponent(UUID().uuidString)
                                                    .appendingPathExtension("pdf")
    for image in images {
        let capturedResult:CapturedResult = cvr.captureFromImage(image, templateName: templateName)
        let items = capturedResult.items ?? []
        for item in items {
            if item.type == CapturedResultItemType.normalizedImage {
                let image:NormalizedImageResultItem = item as! NormalizedImageResultItem
                try? imageManager.saveToFile(image.imageData!, path: url.path, overWrite: true)
            }
        }
    }
    DispatchQueue.main.async {
        self.statusLabel.text = ""
        let objectsToShare = [url]
        let activityVC = UIActivityViewController(activityItems: objectsToShare, applicationActivities: nil)

        self.present(activityVC, animated: true, completion: nil)
    }

}
已转换文件的截图:
源代码
查看源代码进行试用:https://github.com/tony-xlh/Merge-Images-to-PDF/tree/main/iOS/PDFCreator